

rohitg00/ai-engineering-from-scratchTutorials & Guides
Learn it. Build it. Ship it for others.
54k
This repo shows how to build a basic MCP server in .NET, expose a tool with the Model Context Protocol, and connect it to VS Code. The guide covers package install, `Program.cs`, and a `mcp.json` server entry so Copilot Chat can call the tool.
Builders who want to create an MCP server in .NET and use it from VS Code Copilot Chat.
You can run a simple MCP tool from Copilot Chat instead of wiring everything by hand.
Shows how to create a console app, add `ModelContextProtocol` and `Microsoft.Extensions.Hosting`, and build a hosted MCP server.
Uses `AddMcpServer().WithStdioServerTransport()` so the server can be launched from the editor through standard input and output.
Defines a sample `HelloTool` with `[McpServerToolType]` and a `SayHello()` method that returns a greeting.
Provides a `mcp.json` example that points VS Code to `dotnet run --project ...HelloSriLankaServer.csproj`.
Shows how to add the server as a tool in Copilot Chat and send a prompt that triggers the MCP tool.
Includes fork, branch, pull request, and badge-claim steps for people contributing to the tutorial project.
dotnet --version
dotnet add package ModelContextProtocol --prerelease
dotnet add package Microsoft.Extensions.Hosting
This guide will help you set up a basic MCP (Model Context Protocol) server in .NET, configure it in VS Code, and interact with it using Copilot Chat.
Fork this repository to your own GitHub account.
Clone your fork to your local machine:
git clone https://github.com/<your-username>/How-To-Create-MCP-Server
cd How-To-Create-MCP-Server
Note: Replace
<your-username>with your actual GitHub username in the clone URL above.
Create a new branch for your changes (for example, feature/my-contribution):
git checkout -b feature/my-contribution
🛑 Already completed steps 1–3?
If you've already forked, cloned, and created your branch, you can skip ahead to 🚀 Start Work Now and continue with the rest of the setup!
Make your changes and commit them.
git add .
git commit -m"my-contribution"
Push your branch to your fork:
git push origin feature/my-contribution
Once you've pushed your changes, go to your GitHub repository in your browser. Switch to the feature/my-contribution branch
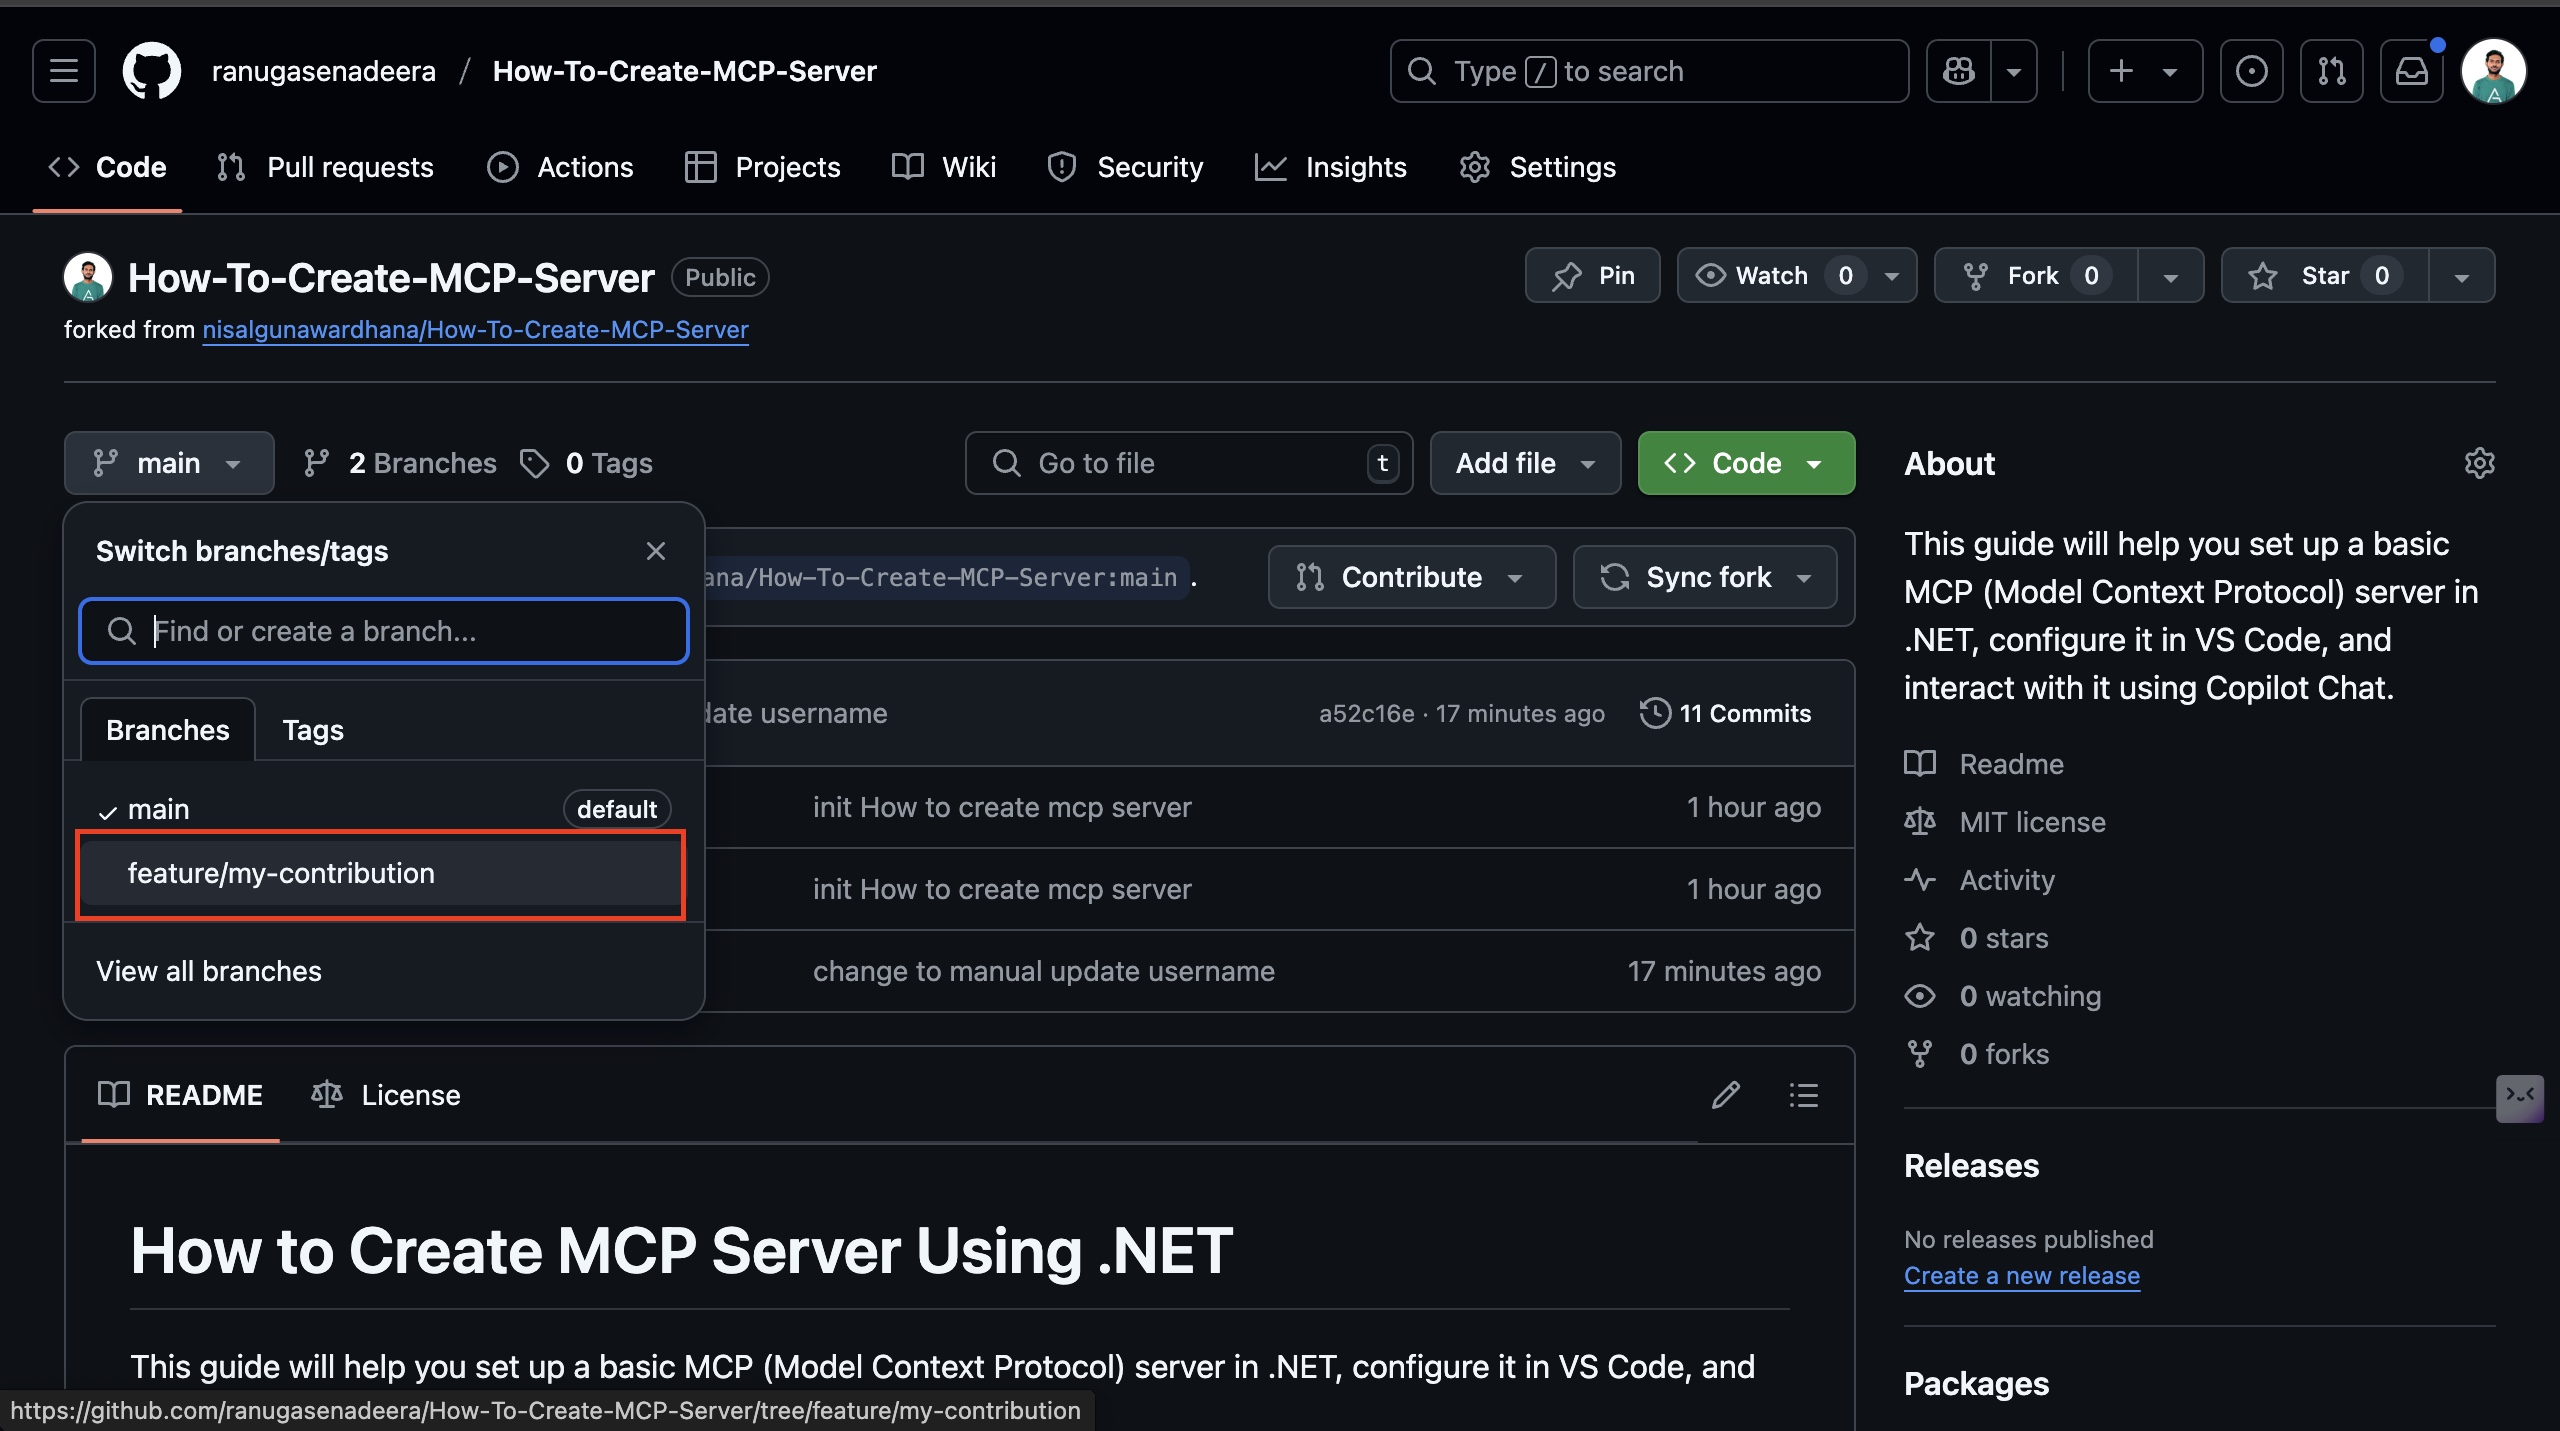
Submit branch of this repository (not main).Step 01
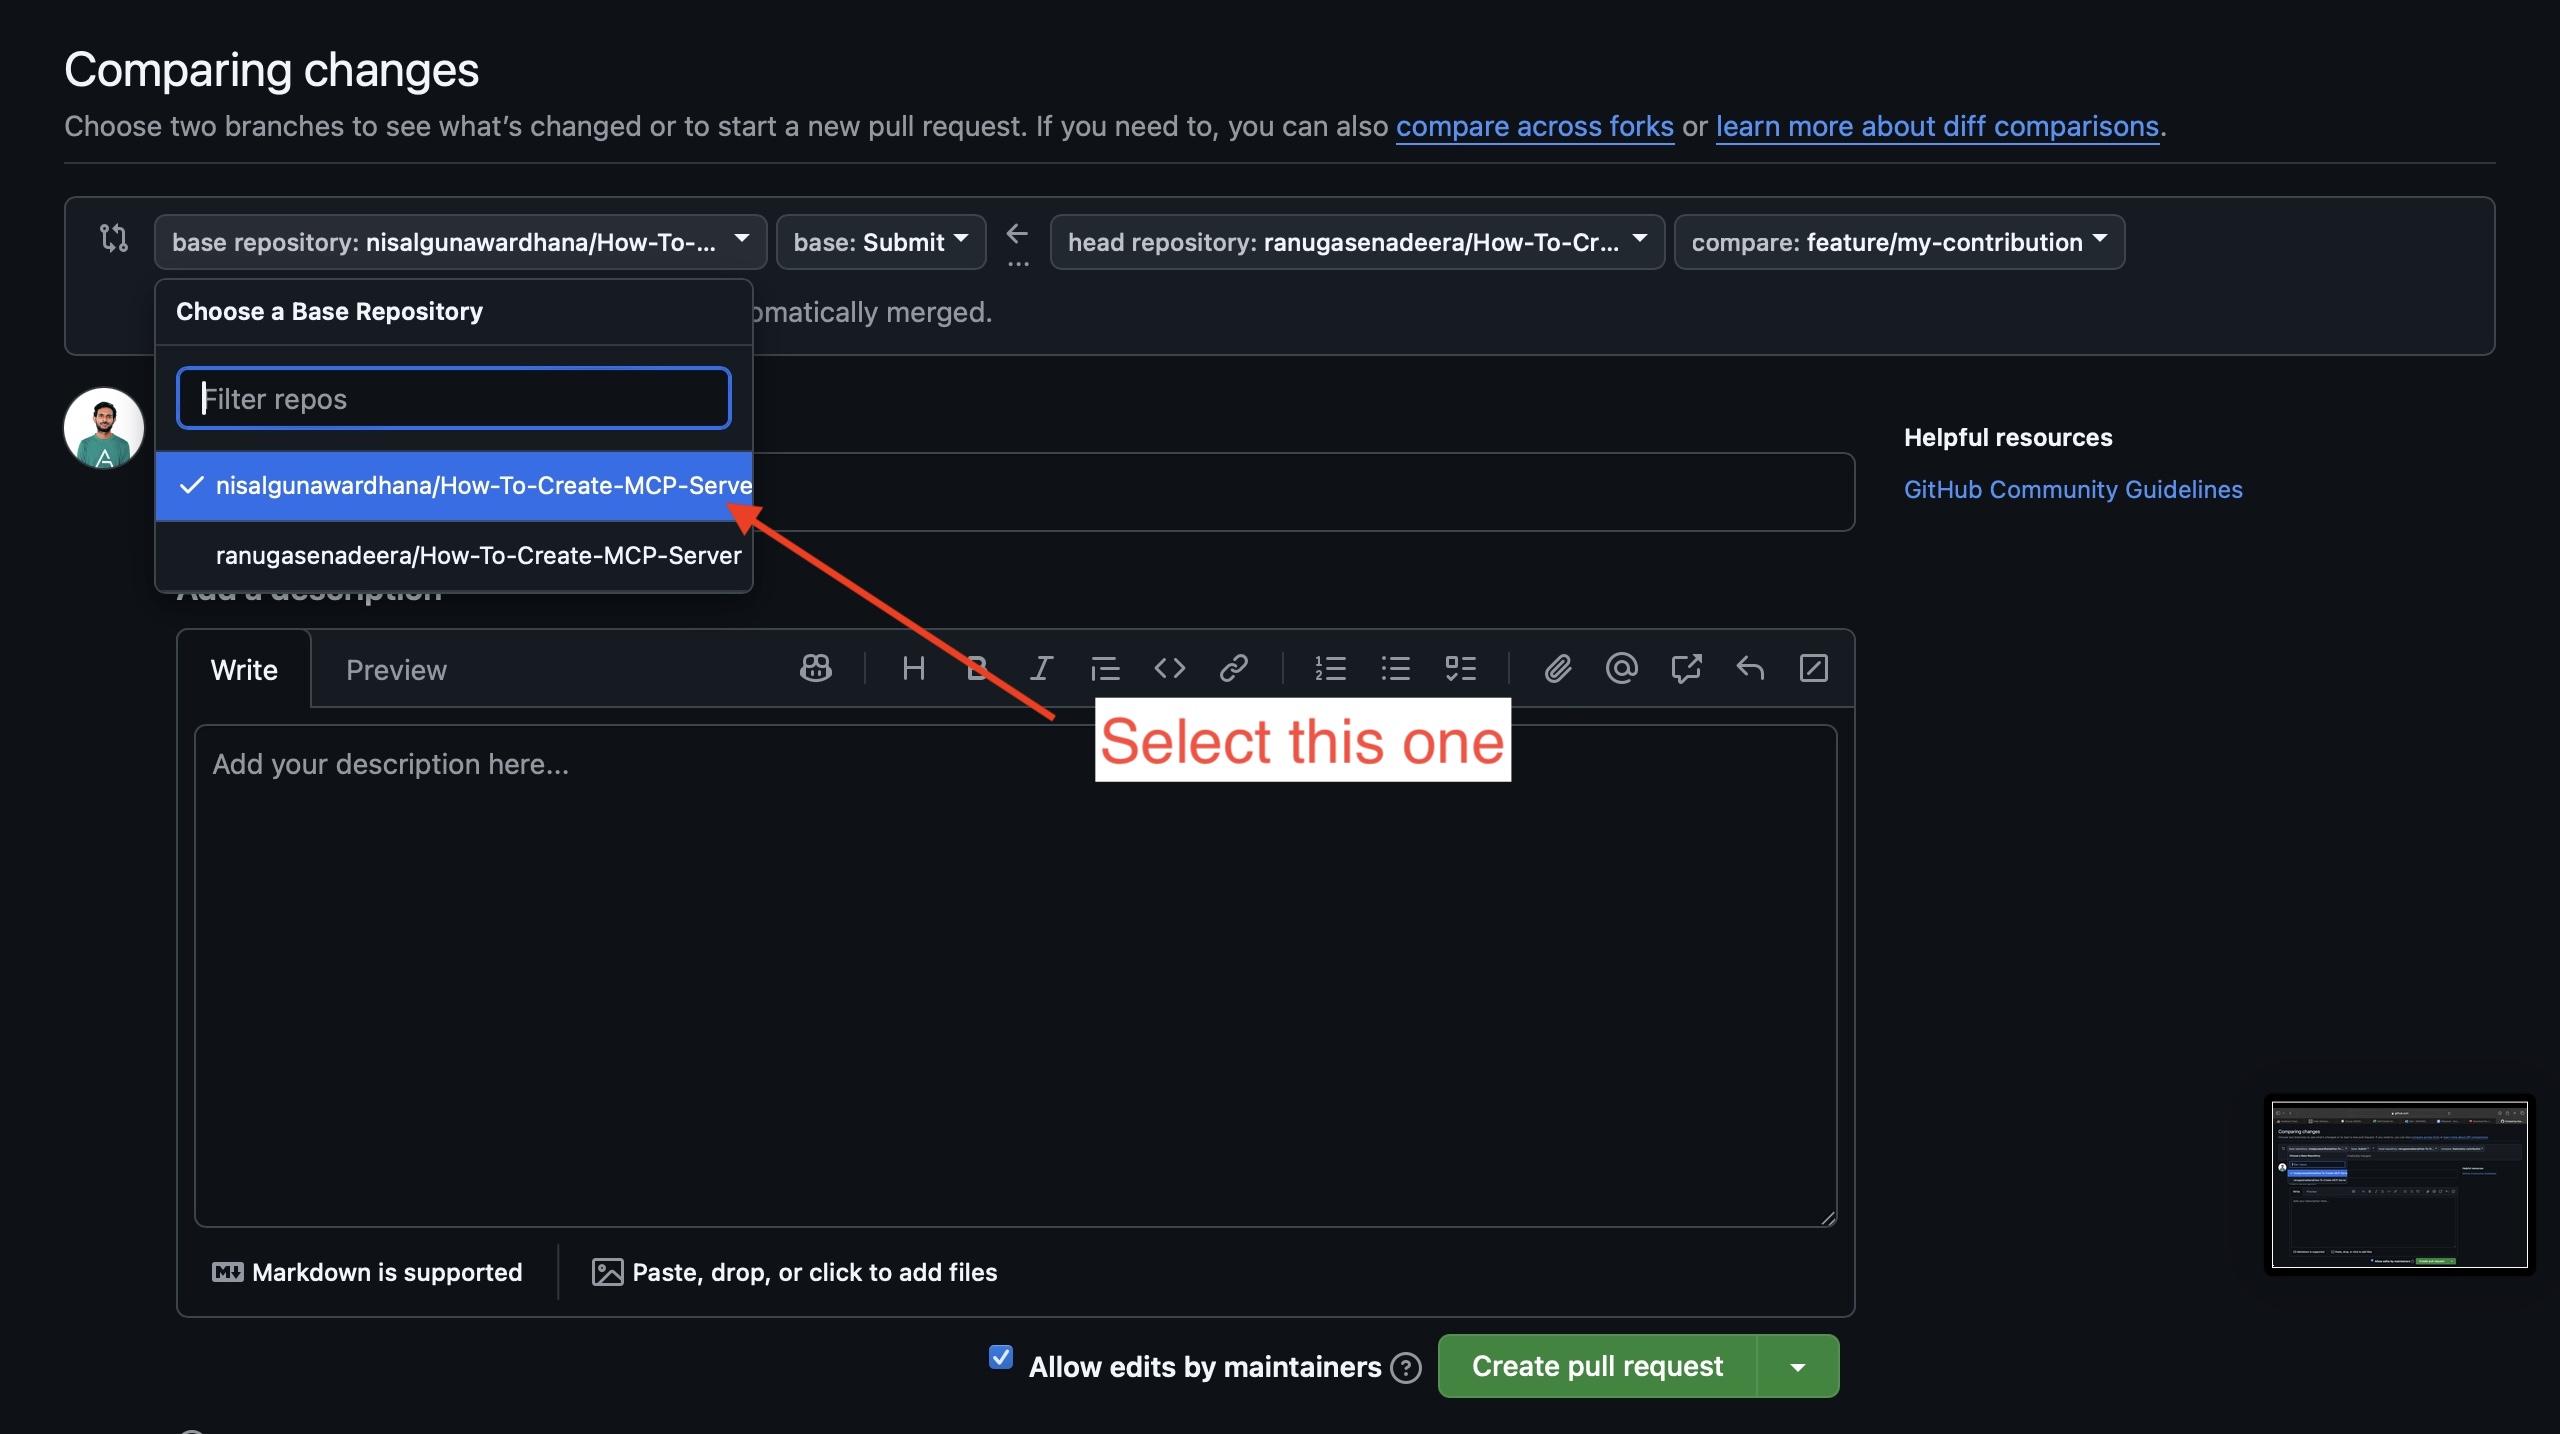 Step 02
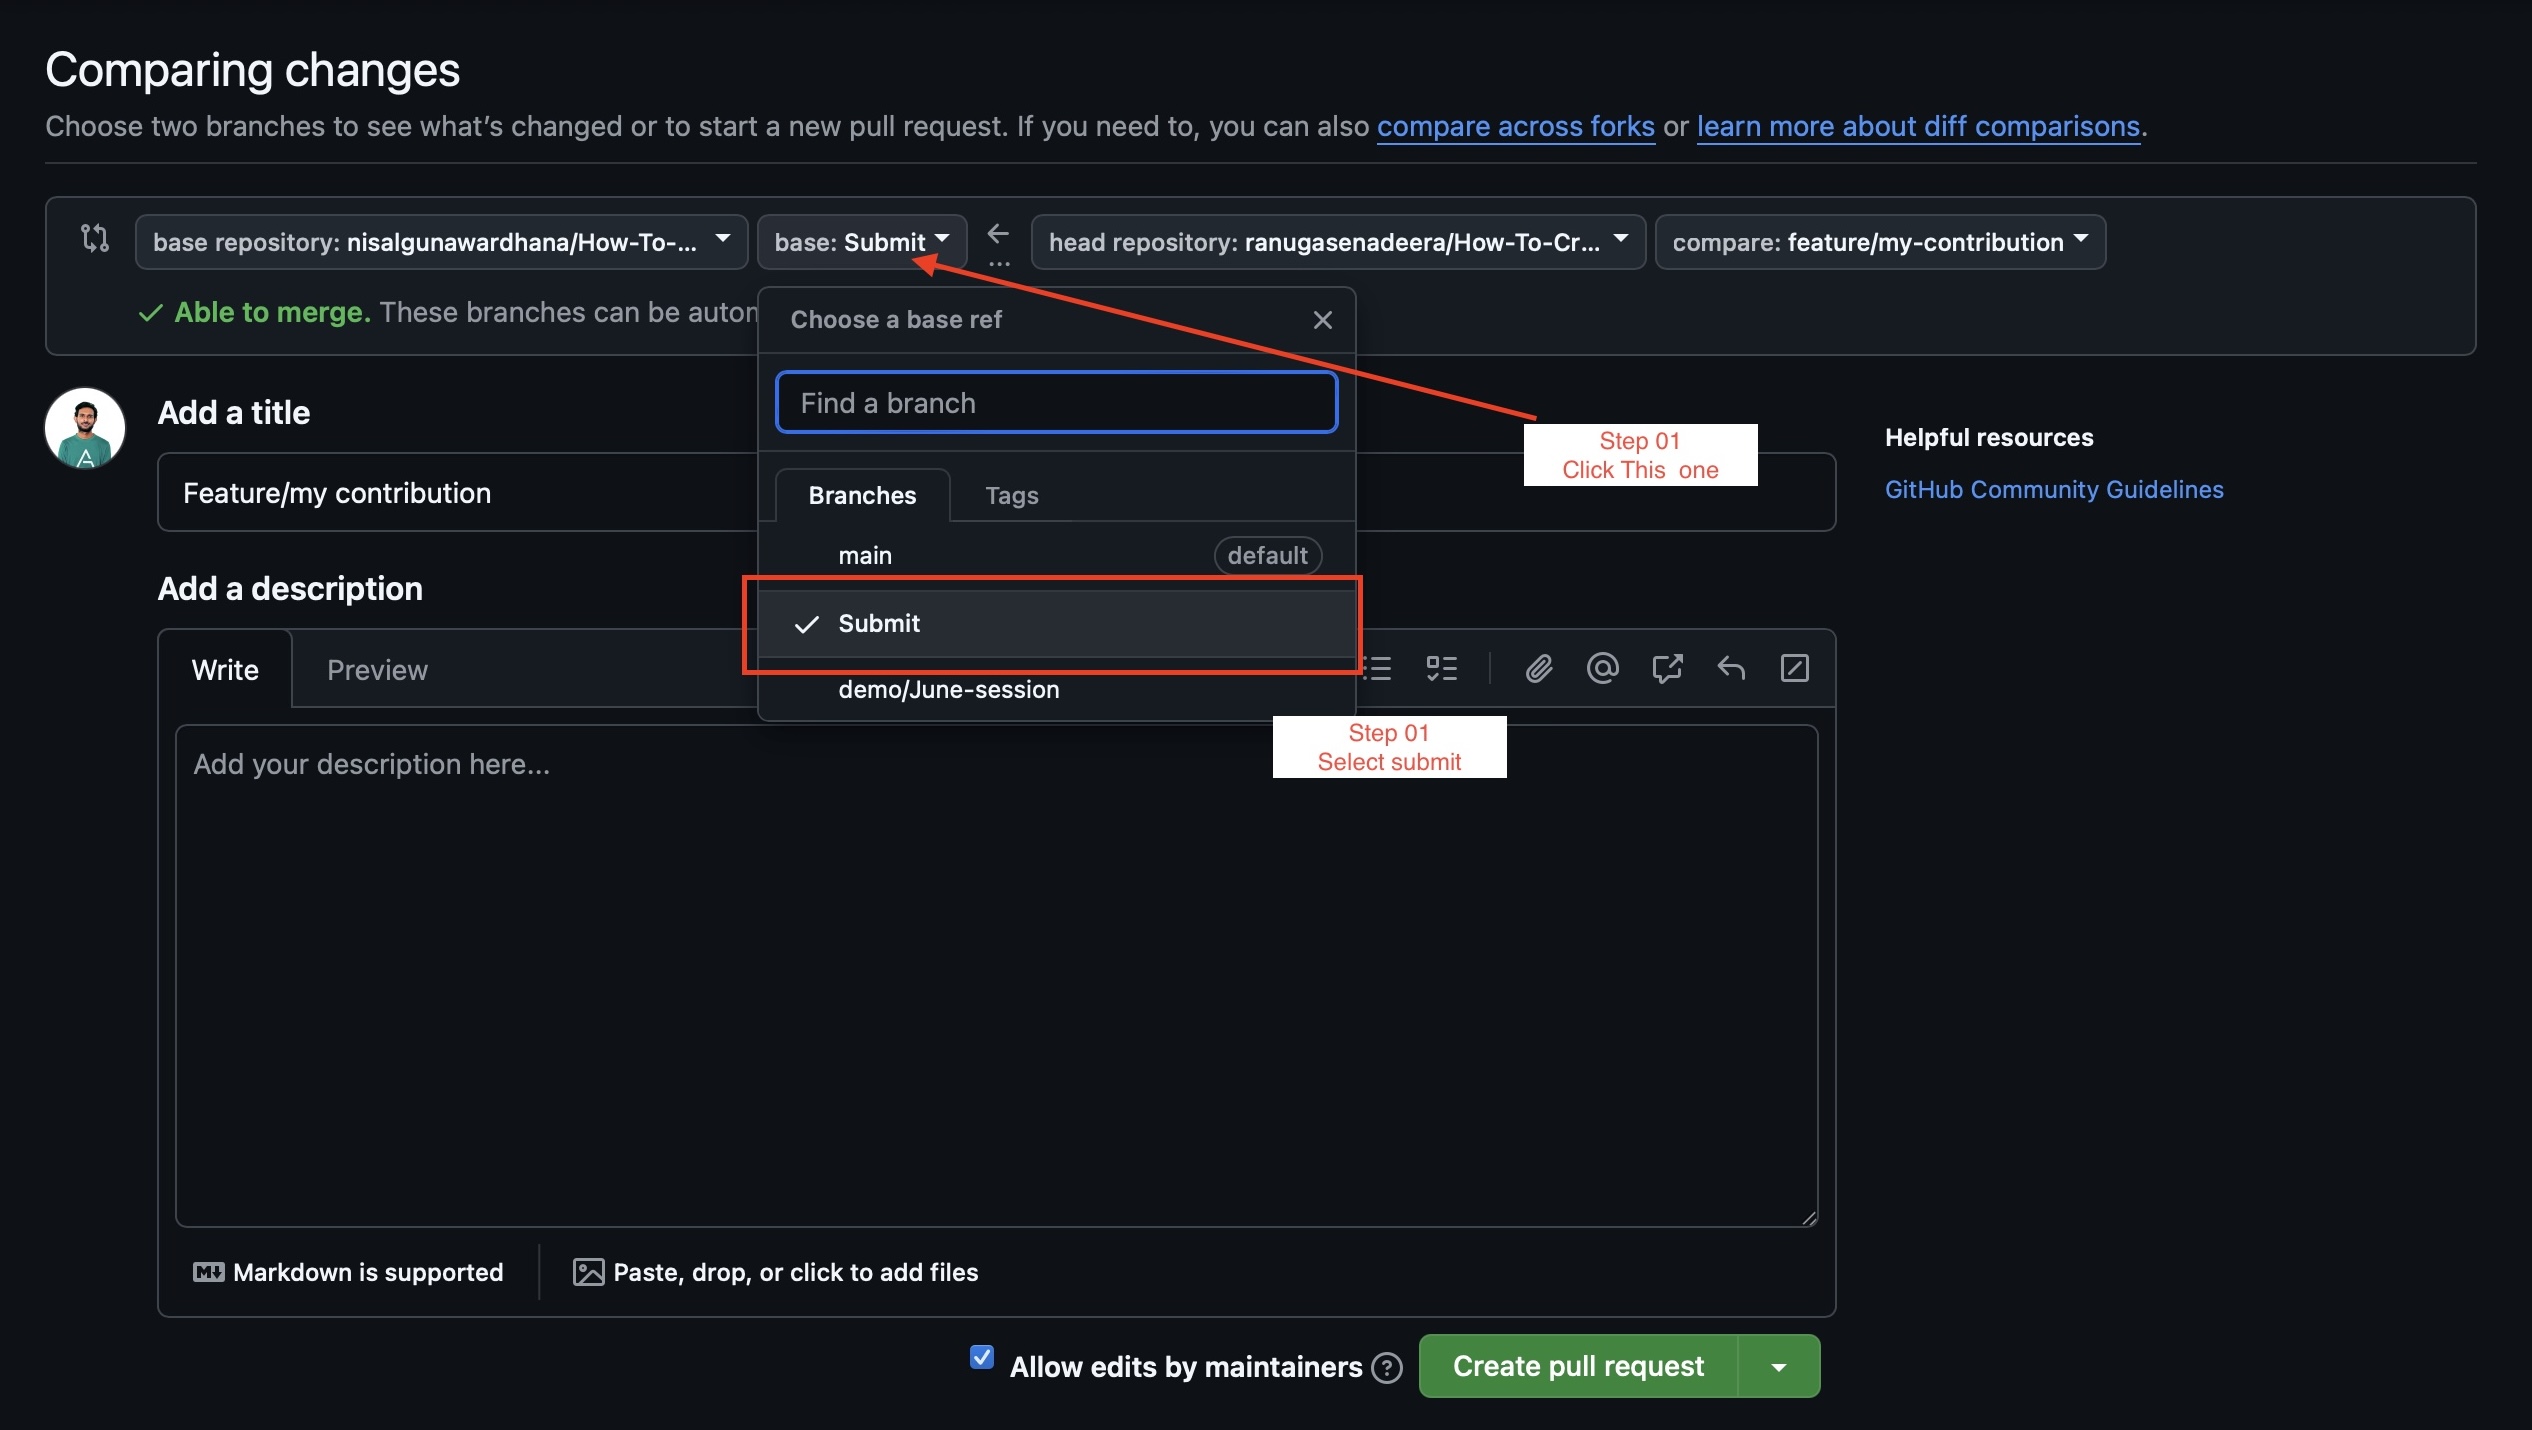
When you create your Pull Request (PR), please add a comment including your full name and email address. This helps us track contributions and contact you if needed.
Example:
Full Name: Nisal Gunawardhana
Email: info@nisalgunawardhana.com
Note: Please do not open PRs directly to the
mainbranch. Always target theSubmitbranch for contributions.
After completing the tutorial and submitting your pull request, you can claim your digital badge by following these steps:
Submit branch (as described above)Go to the Issues tab
Click on "New Issue"
Select the "🎯 Submission for Digital Badge" template
Fill out the form with:
Make sure to check all the requirement boxes at the bottom
Click "Submit new issue"
Once you submit your issue:
submission and pending reviewWhen your submission is approved:
approved and completed will be added, pending review will be removedNote: Digital badges are only issued when the issue is closed by @nisalgunawardhana to ensure proper verification of submissions.
You'll receive:
Example of what you'll receive:
Follow the steps below to set up and run the MCP server.
Ready to dive in?
After cloning and setting up your branch, you can immediately begin making changes or adding features to the MCP server project. Use the provided steps below to guide your development process. If you get stuck, refer to the resources and discussion links at the end of this guide.
Download and install the .NET SDK for your OS.
Note: This guide uses .NET SDK 8. Make sure you download the correct version for your operating system.
If you're using VS Code, install the C# Dev Kit extension for the best development experience.
Verify installation in your terminal:
dotnet --version
Open your terminal and run:
dotnet new console -o HelloSriLankaServer
cd HelloSriLankaServer
Install the necessary NuGet packages:
dotnet add package ModelContextProtocol --prerelease
dotnet add package Microsoft.Extensions.Hosting
After creating the project, your folder structure should look like this:
How-To-create-MCP-Server/
├── HelloSriLankaServer/
│   ├── Program.cs
│   ├── HelloSriLankaServer.csproj
│   └── (other project files)
├── images/
│   ├── image1.png
│   └── image2.png
├── README.md
├── .gitignore.md
└── LICENSE
This structure helps keep your source code, configuration, and documentation organized.
Program.csClear the contents of Program.cs and replace with:
using Microsoft.Extensions.DependencyInjection;
using Microsoft.Extensions.Hosting;
using Microsoft.Extensions.Logging;
using Microsoft.Extensions.Logging.Console;
using Microsoft.Extensions.Options;
using ModelContextProtocol.Server;
using System.ComponentModel;

var builder = Host.CreateApplicationBuilder(args);

builder.Logging.AddConsole(options => {
    options.LogToStandardErrorThreshold = LogLevel.Trace;
});

builder.Services.AddMcpServer()
    .WithStdioServerTransport()
    .WithToolsFromAssembly();

Console.WriteLine(builder.Environment.ContentRootPath);
var app = builder.Build();

await app.RunAsync();

[McpServerToolType]
public static class HelloTool
{
    [McpServerTool(Name = "HelloTool"), Description("Say hello to Sri Lanka")]
    public static void SayHello()
    {
        Console.WriteLine("Hello Sri Lanka!");

    }
}
.vscode directory:Before creating the .vscode directory, navigate back to the project root if you're inside the HelloSriLankaServer folder:
cd ..
mkdir -p .vscode
After creating the .vscode directory, your folder structure should look like this:
How-To-create-MCP-Server/
├── HelloSriLankaServer/
│   ├── Program.cs
│   ├── HelloSriLankaServer.csproj
│   └── (other project files)
├── images/
│   ├── image1.png
│   └── image2.png
├── .vscode/
├── README.md
├── .gitignore.md
└── LICENSE
Inside .vscode, create a file named mcp.json and add your server configuration.
Once created, you will see an Add Server button. Click it.
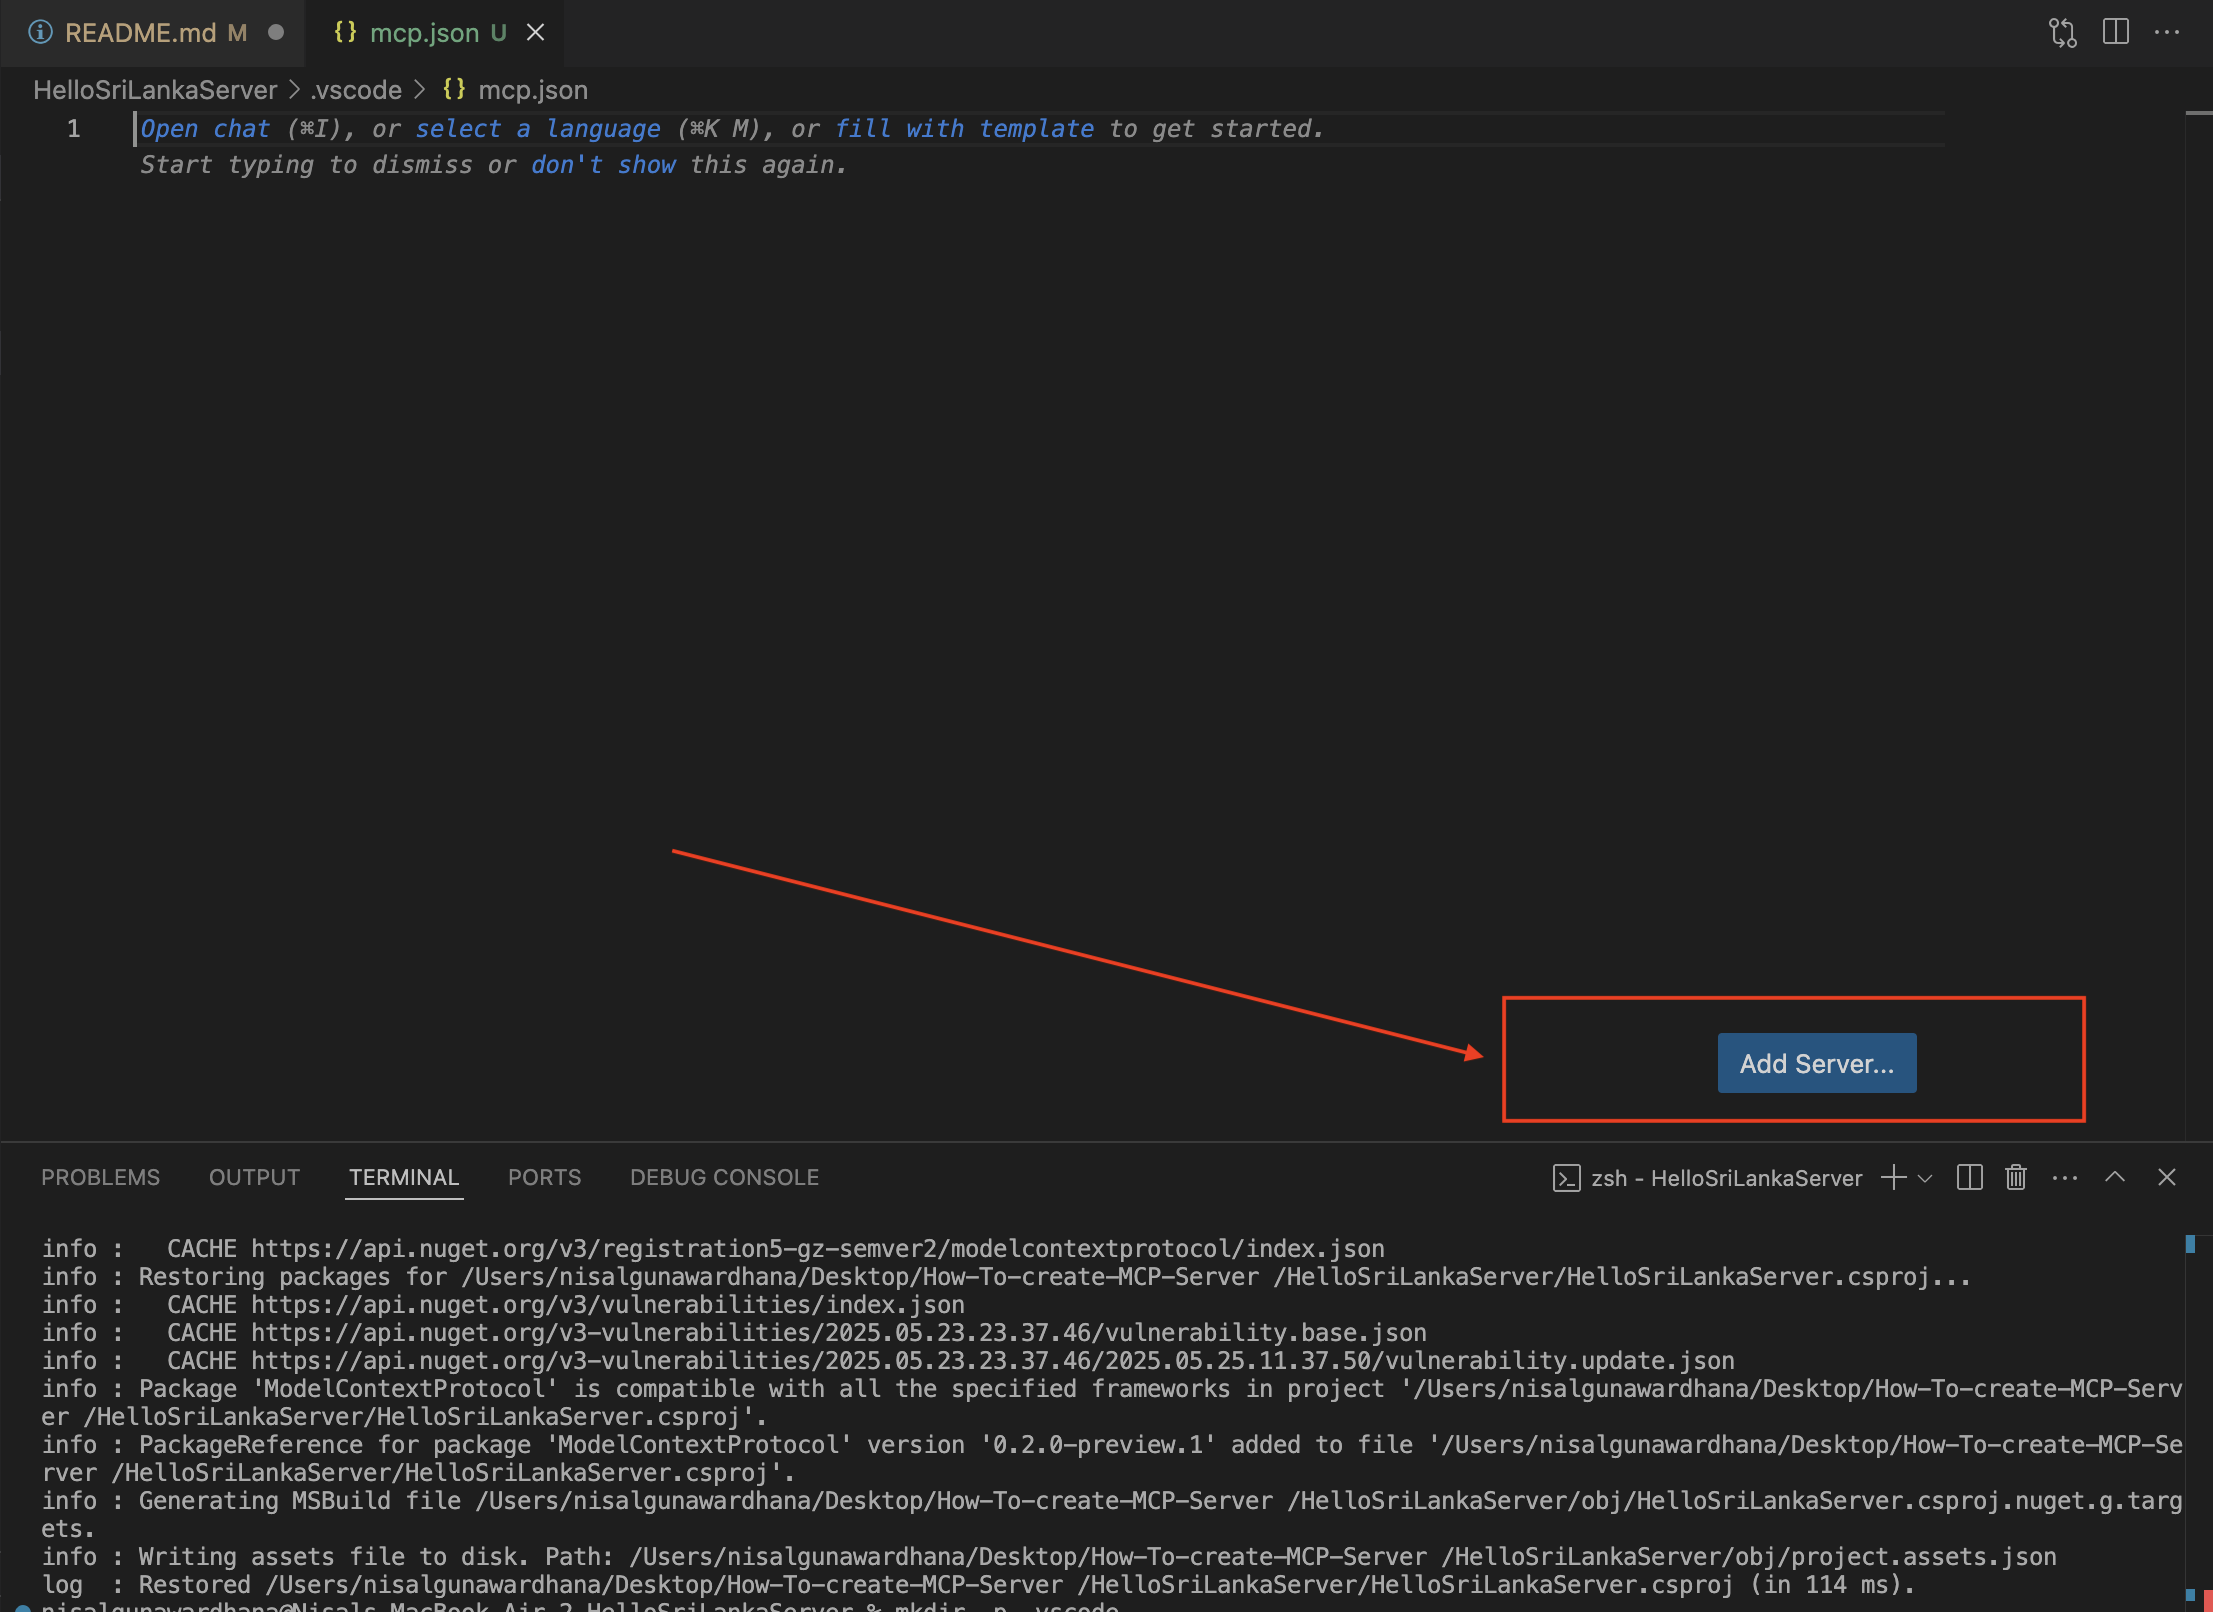
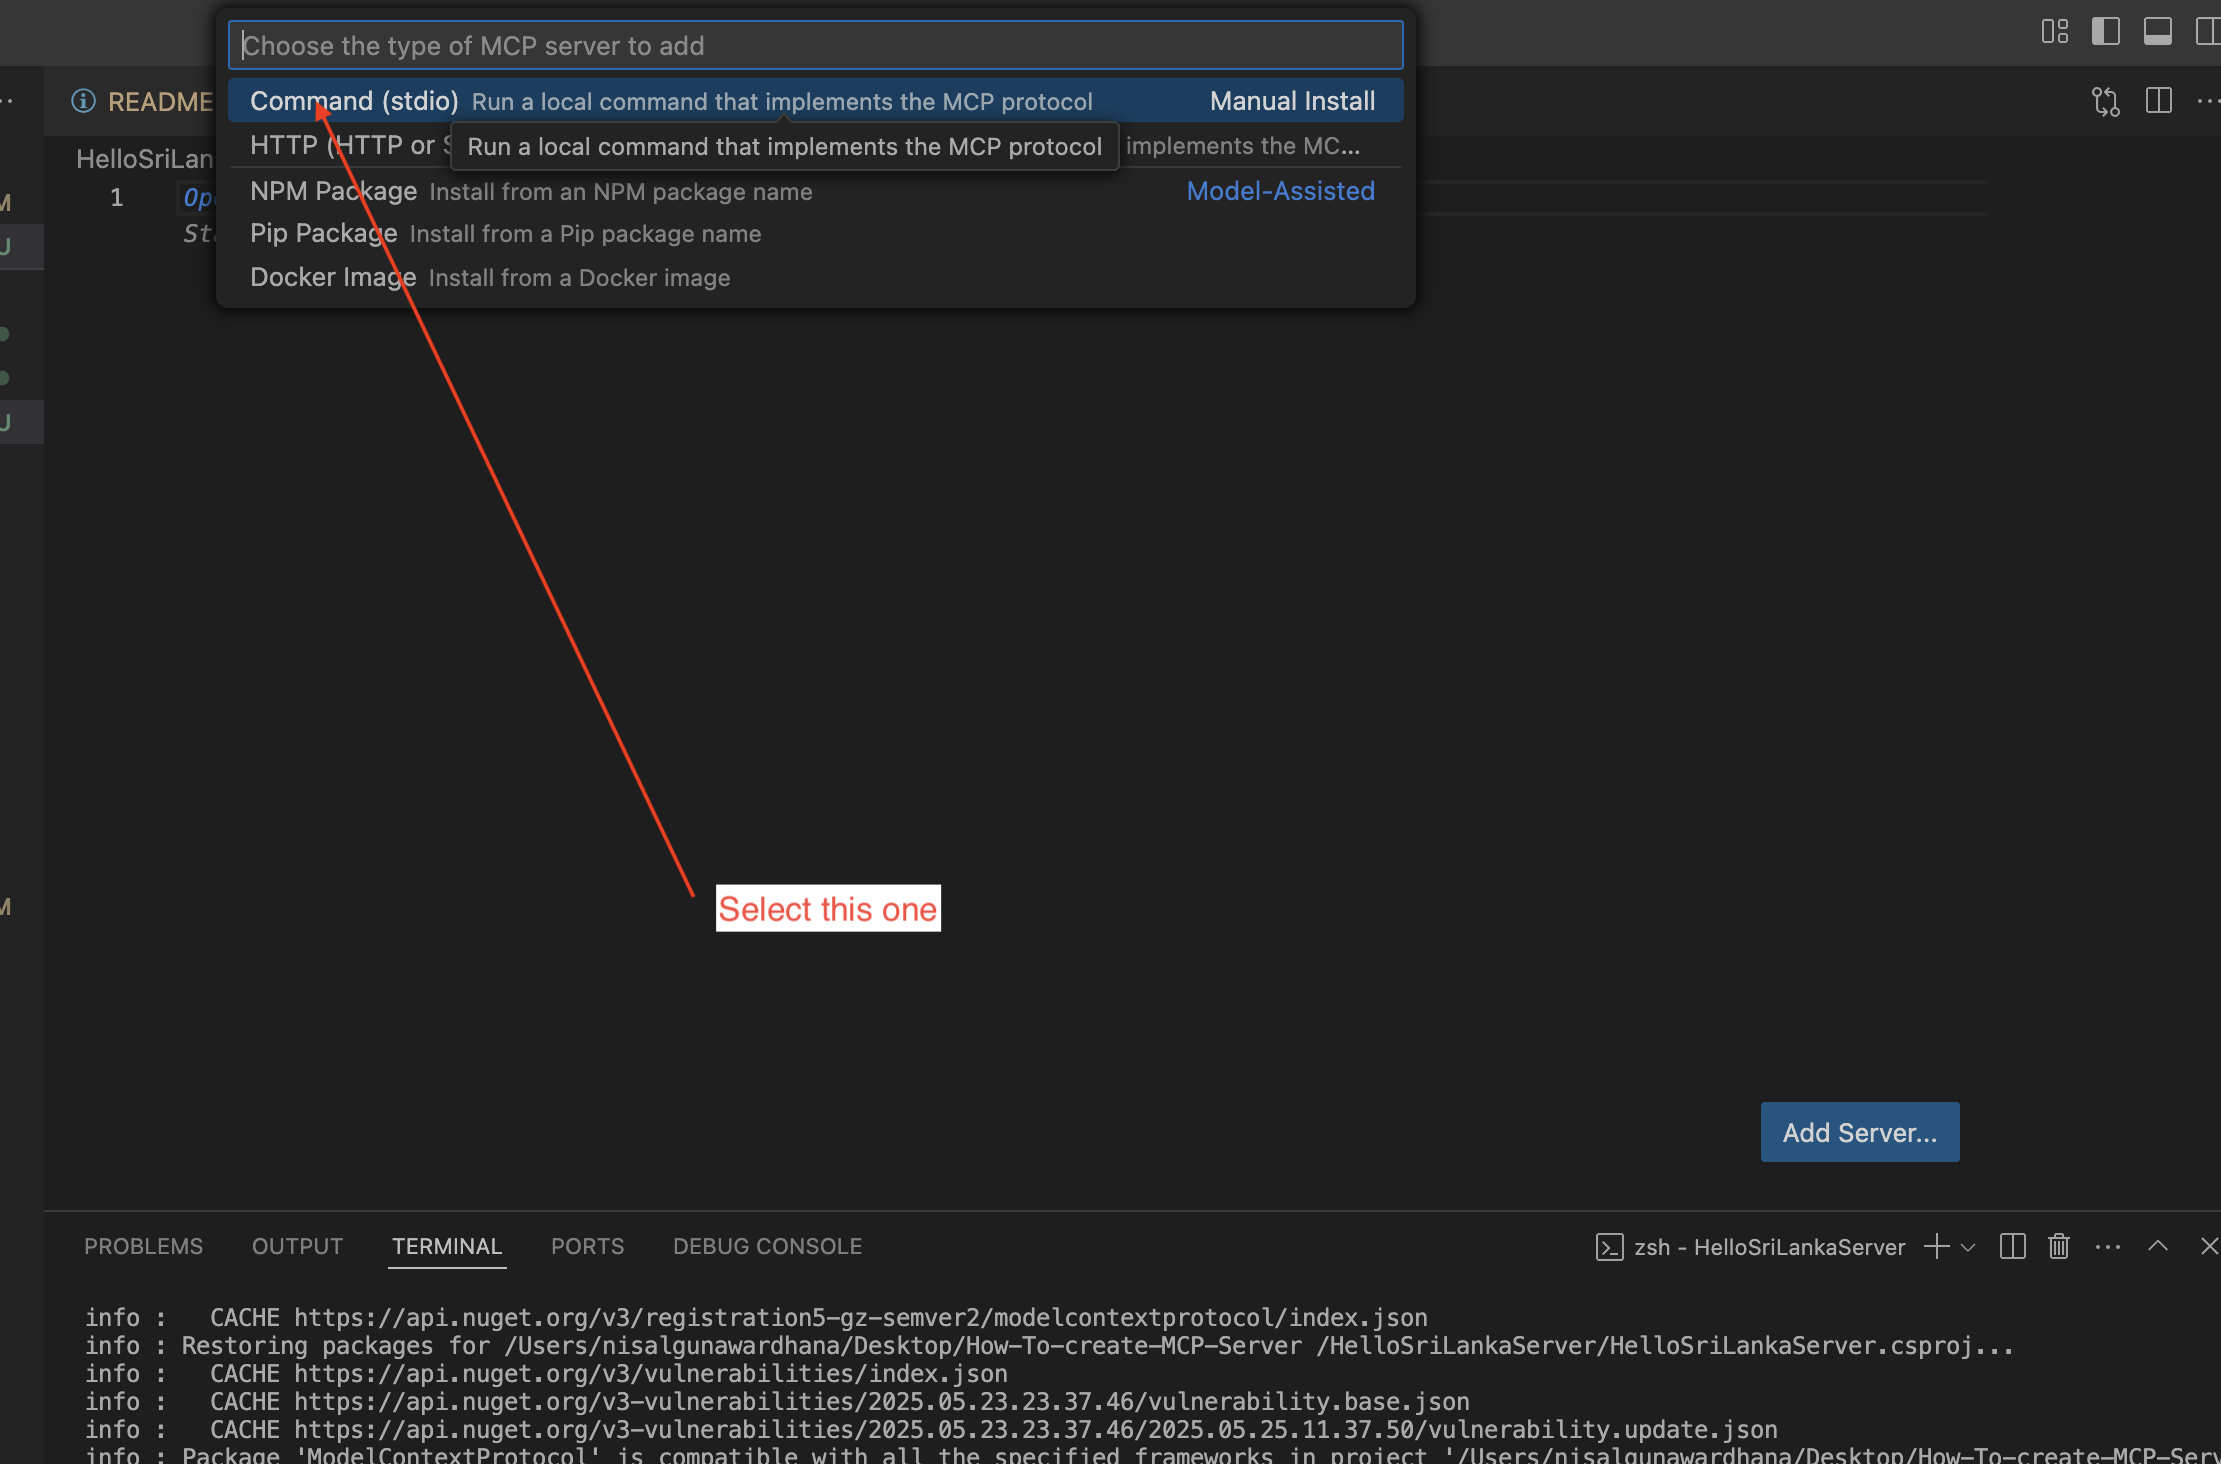
Choose "Command (stdio)" as the server type.
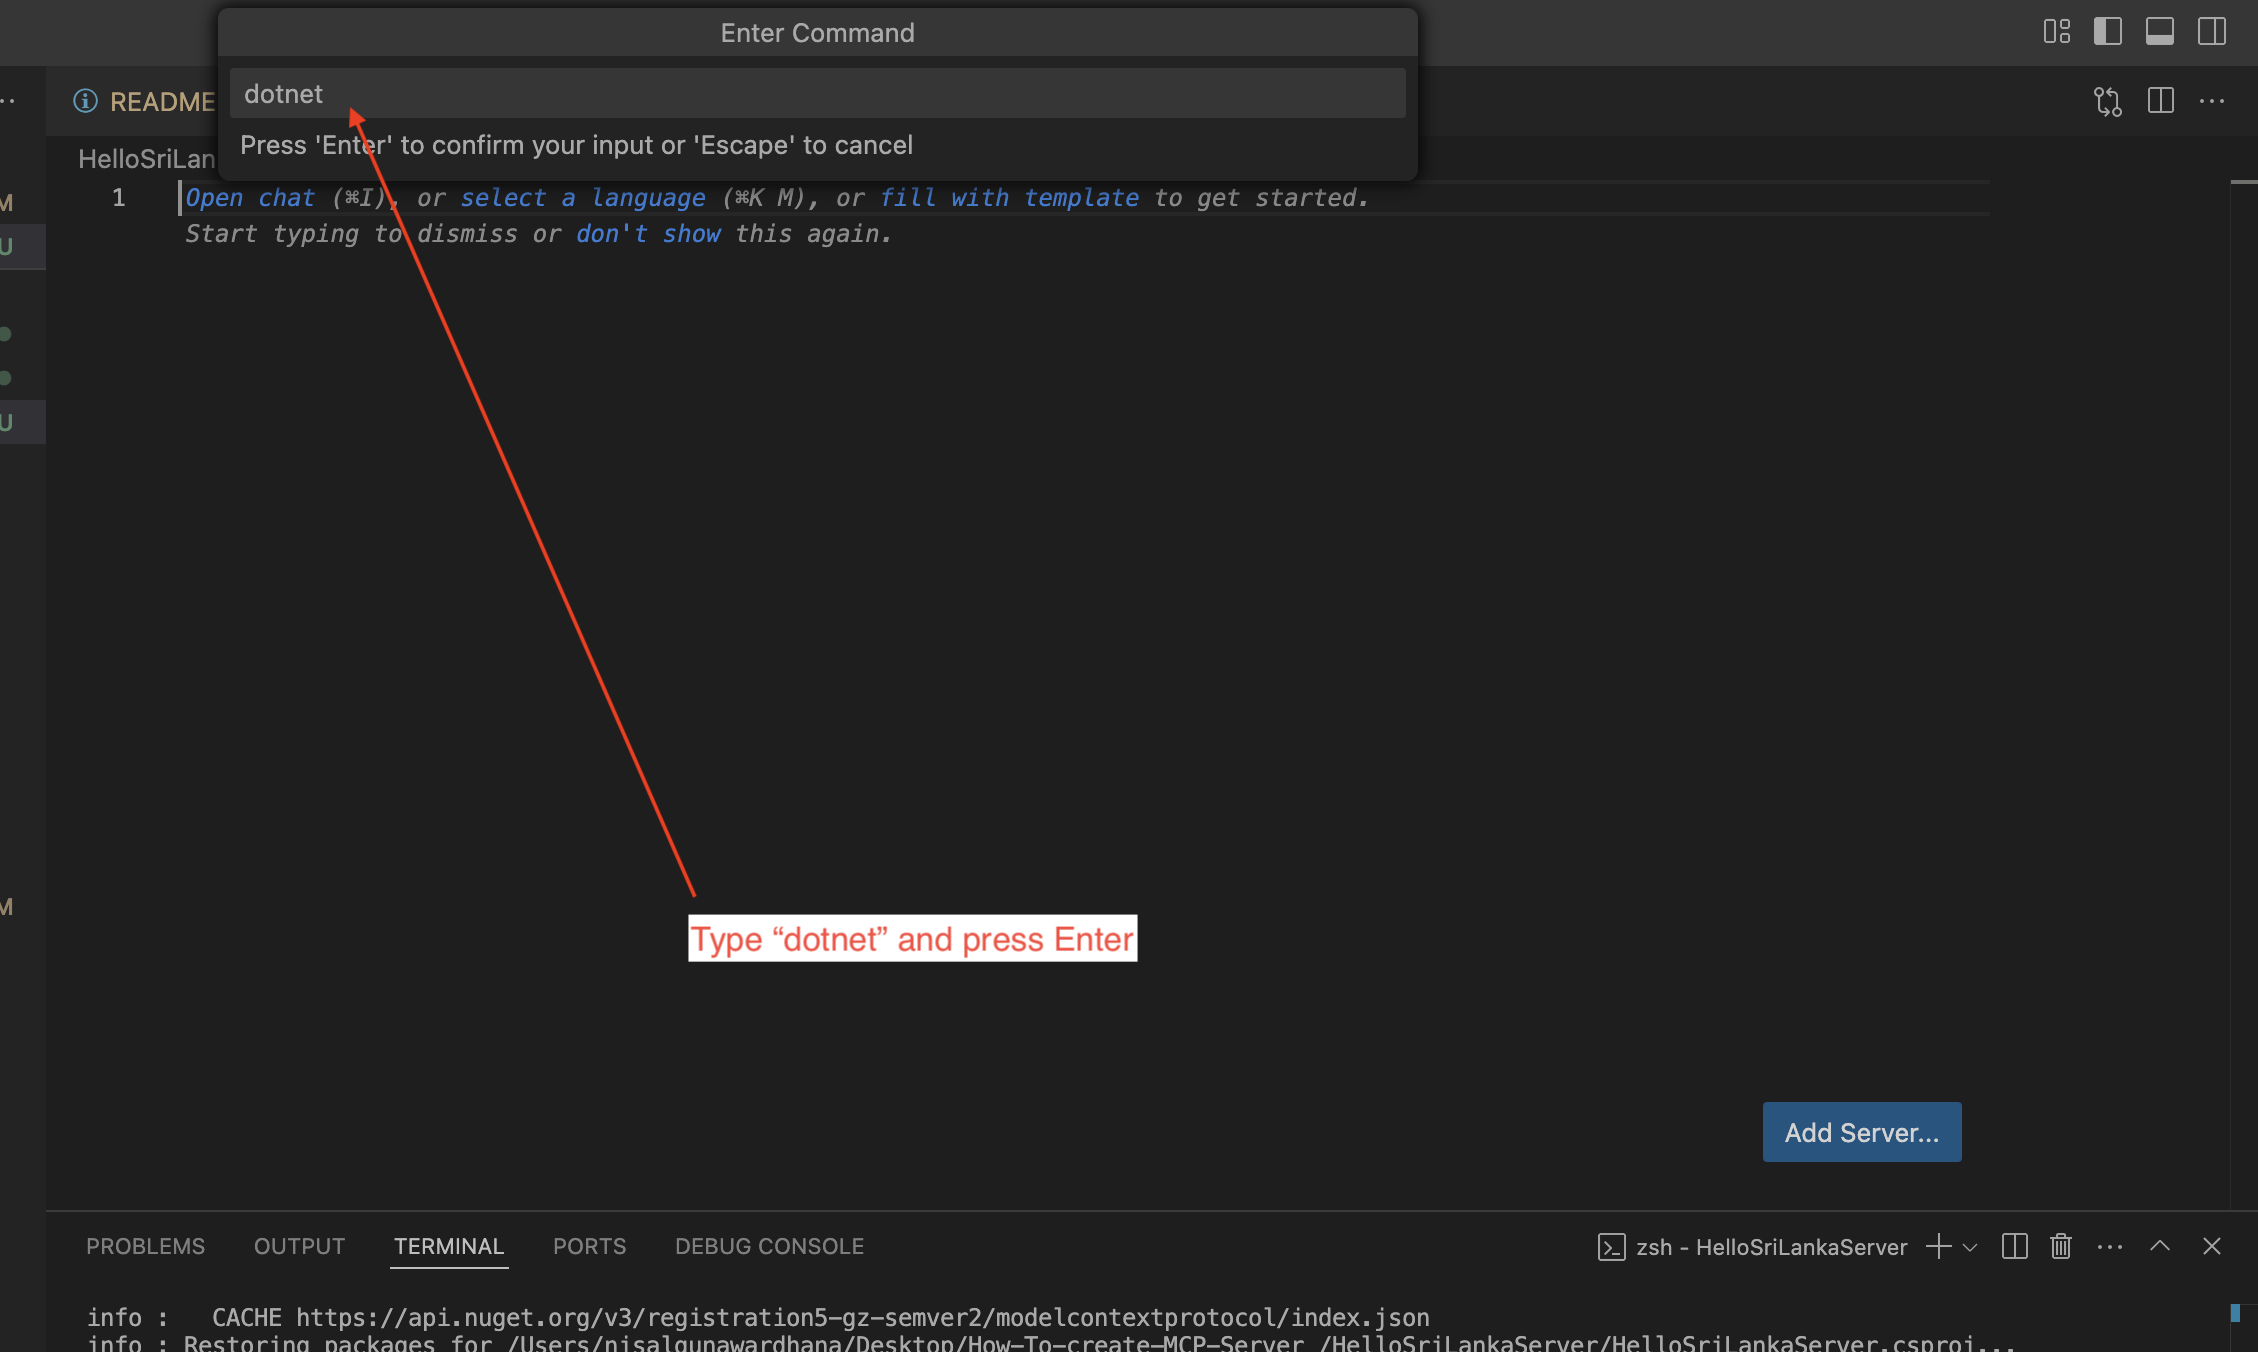
Enter "dotnet" as the command and press Enter.
Enter the server name "Hello-SriLankaServer" and press Enter.
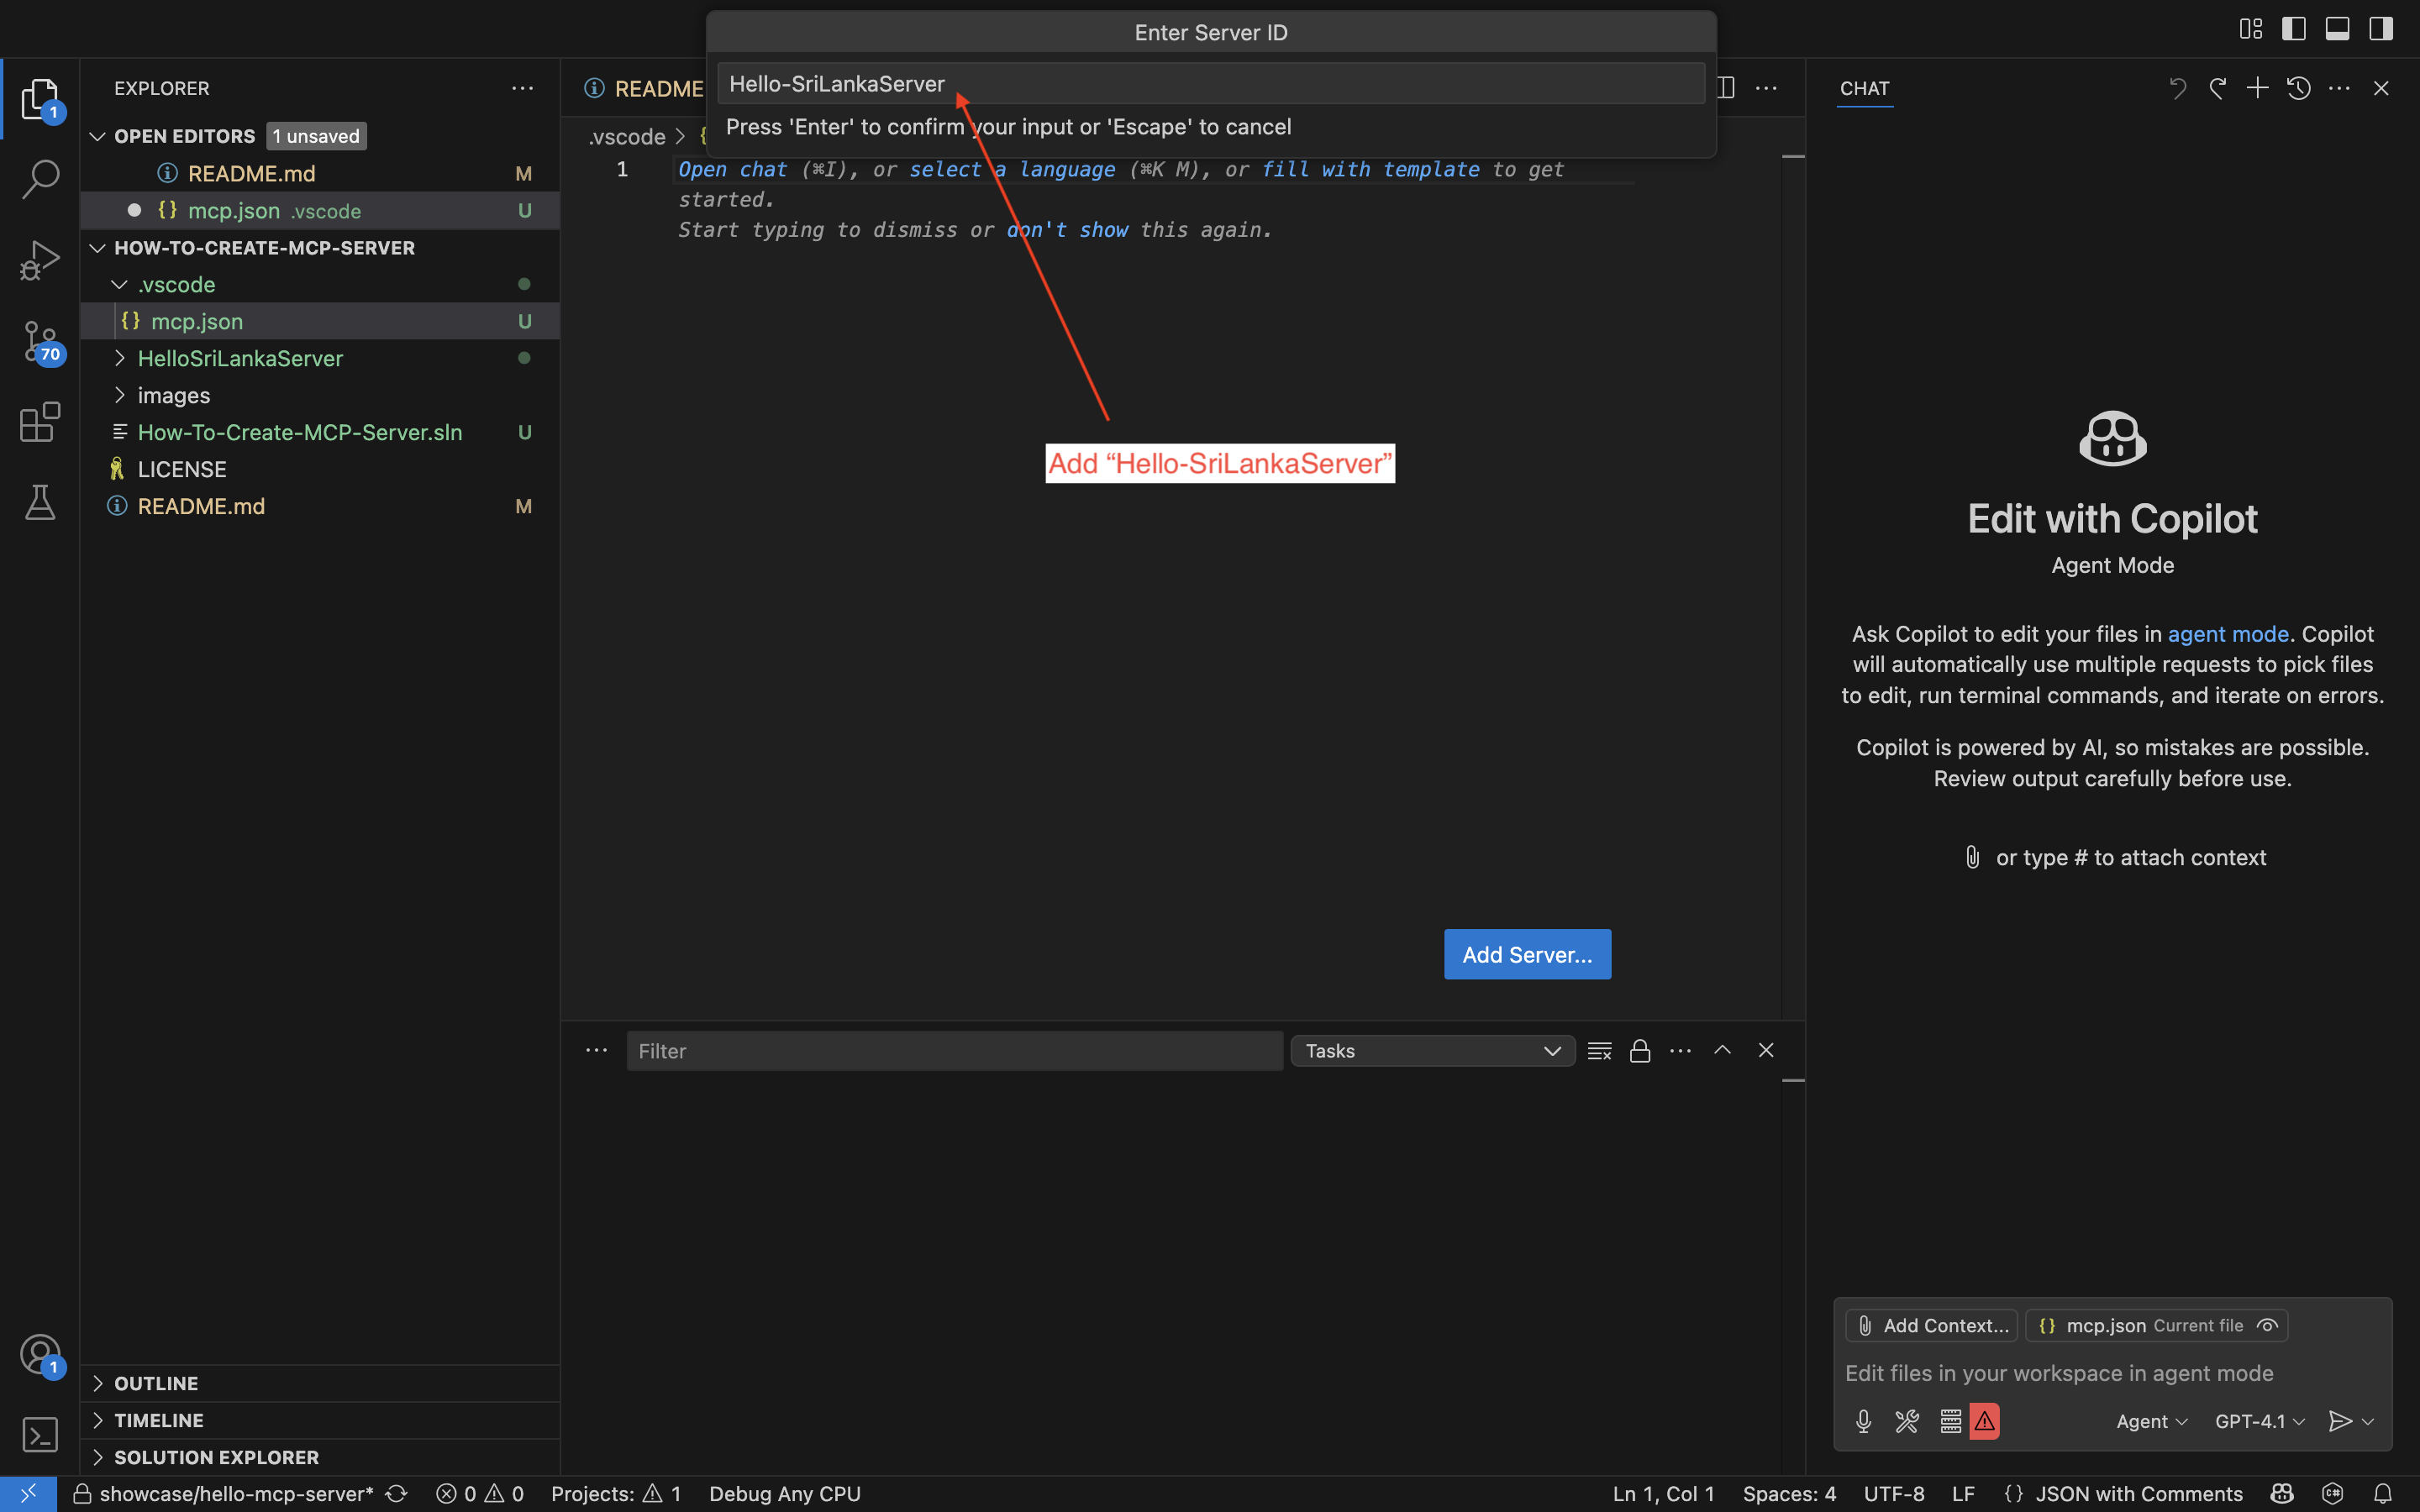
The mcp.json file will be populated automatically. Replace missing contents with the following:
{
  "servers": {
    "Hello-SriLankaServer": {
      "type": "stdio",
      "command": "dotnet",
      "args": [
        "run",
        "--project",
        "${workspaceFolder}/HelloSriLankaServer/HelloSriLankaServer.csproj"
      ]
    }
  }
}
Note:
${workspaceFolder}will automatically resolve to your project root. If it does not work, replace it with the actual path to your.csprojfile (right-click the file in VS Code and select "Copy Path").
From the HelloSriLankaServer directory, start the server:
dotnet run
Note: Once you've confirmed the server is running successfully, you can stop it (press
Ctrl+Cin the terminal) and proceed to the next step (Step 7).
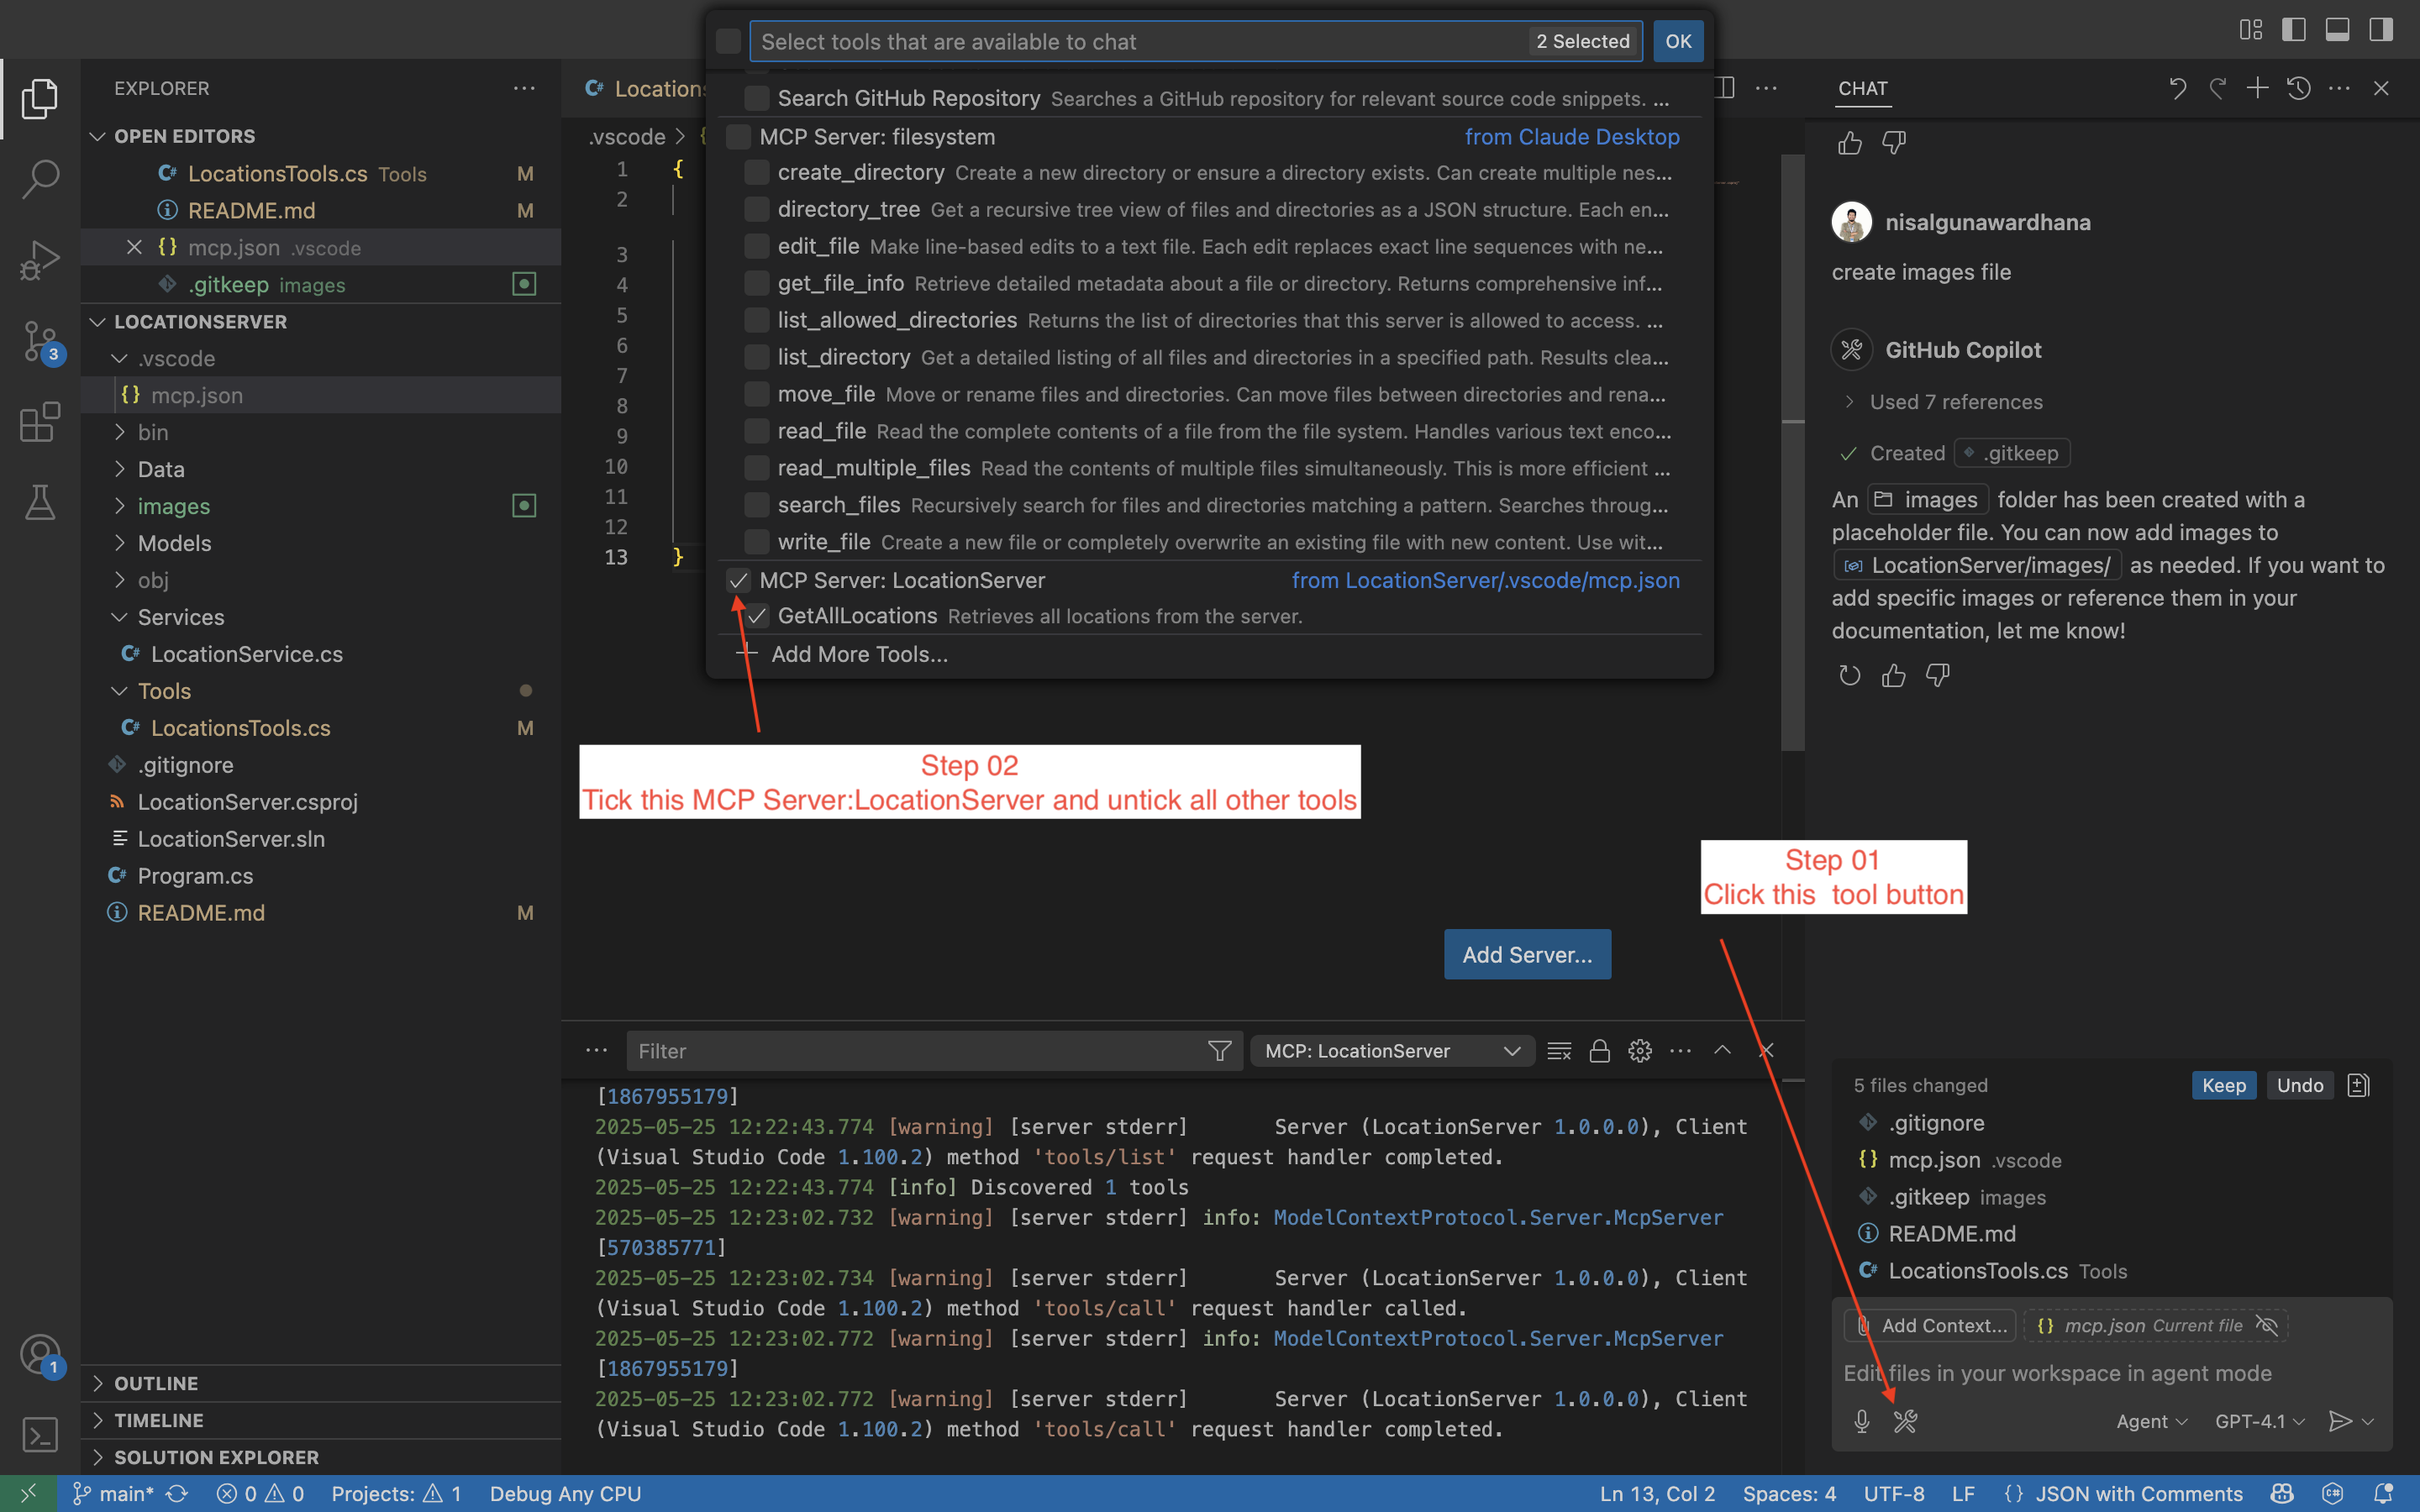
Note: Before adding the tool in Copilot Chat, make sure your MCP server is running. Then, open the
mcp.jsonfile in VS Code. You will see a small "Add Tool" button appear just below the(2nd Line)"servers": {line in the JSON code—click this button to proceed.
Hello-SriLankaServe) from the list.Image Example:
Note: The example images may display "LocationServer" or a similar name, but it actually refers to your MCP server (
Hello-SriLankaServer).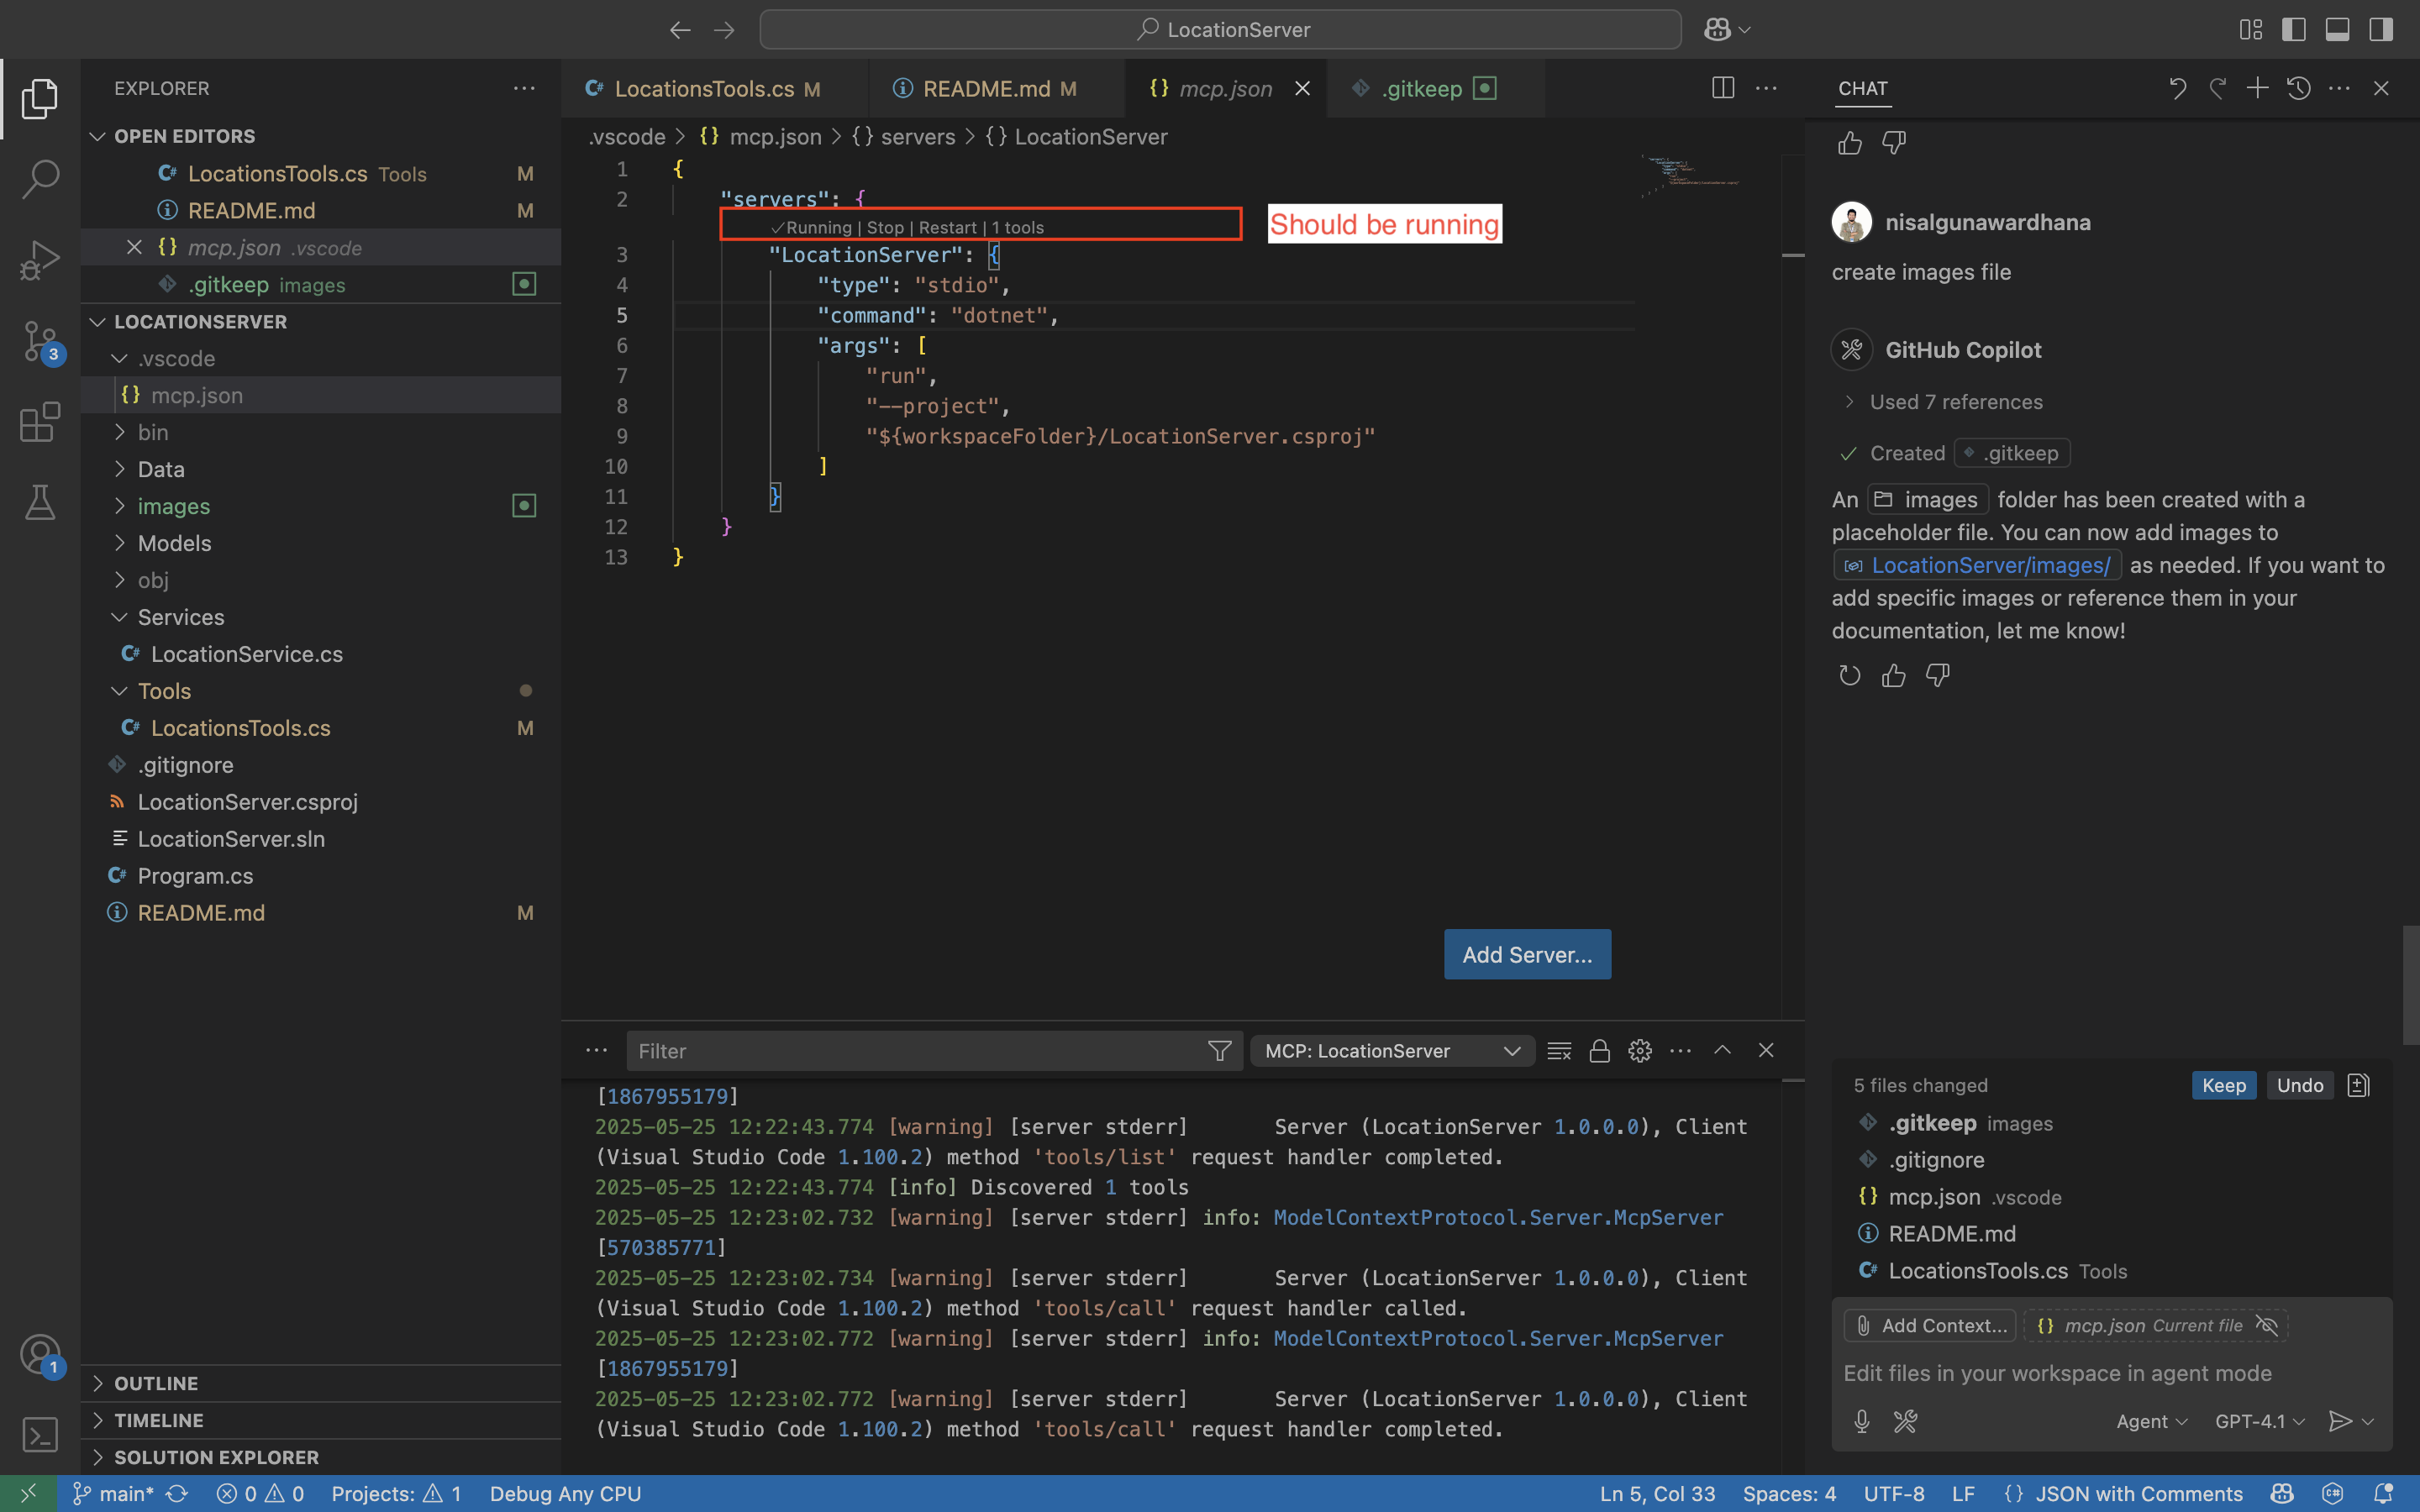
In Copilot Chat, select the Hello-SriLankaServer tool.
Type a message to invoke your tool, for example:
Can you Say hello to Sri Lank
Note: You may need to grant permission or continue when prompted by VS Code. Sometimes, Copilot Chat or other AI tools do not have access to the terminal or workspace by default. If you see a prompt asking for access, make sure to allow it so your tool can run successfully.
You should see a reply from your MCP server in the chat.
Hello Sri Lanka !
You will receive a response from your MCP server in the Copilot Chat window.
For a more advanced example, you can explore the Try-mcp-location-server-demo repository. This demo showcases how to build and interact with a location-based MCP server using .NET.
Love this project? Share it with your friends and community for a chance to win exclusive tech swag!
How to participate:
Fill out this form to request your personalized share link. We'll send your unique link to your email within 2–3 business days.
Share and Win:
Once you receive your link, share it with your friends. Ask them to complete the project and include your referral link when they submit.
Why share?
The more friends who use your referral link, the higher your chances to win cool tech goodies—stickers, shirts, and more!
Note: Make sure your email is visible in your GitHub profile or mention it in the form when you request your link.
Stay tuned—winners will be announced in the Discussions tab!
For a deeper understanding of MCP and more hands-on examples, check out the Introduction to MCP repository. This resource provides tutorials, sample projects, and further guidance on working with MCP in .NET.
Have questions, ideas, or want to share your experience?
We welcome you to use GitHub Discussions for:
👉 Click the "Discussions" tab at the top of this repo to start or join a conversation!
Let's build and learn together!
Follow me on social media for more sessions, tech tips, and giveaways:
Feel free to connect and stay updated!
Sign in to join the discussion.
No comments yet. Be the first to say what this is good for.
Learn it. Build it. Ship it for others.

Bash is all you need - A nano claude code–like 「agent harness」, built from 0 to 1

A visual, example-driven guide to Claude Code — from basic concepts to advanced agents, with copy-paste templates that bring immediate value.

Specification and documentation for Agent Skills
💻 vibe coding 101|The first course for AI-native product builders.

End-to-end, code-first tutorials for building production-grade GenAI agents. From prototype to enterprise deployment.