
JuliusBrussee/
caveman

🪨 why use many token when few token do trick — Claude Code skill that cuts 65% of tokens by talking like caveman
105k
1 add
rustunnel publishes local services through a public edge server over TLS-encrypted WebSocket connections. The server handles HTTP and HTTPS routing, TCP and UDP tunnels, dashboard access, metrics, and audit logging, while the client opens tunnels from your machine. The repo also ships agent-facing pieces: an MCP server, integration guides, plugin files, and skill files so builders can wire the tunnel workflow into Claude Code, Codex, Cursor, Windsurf, and other agents.
Builders who need a reusable way to expose local apps, APIs, and databases to the internet or to an agent toolchain.
You can share local services through stable public URLs instead of manually managing ad hoc reverse proxies.
Opens different tunnel types from a local port to a public endpoint, including peer-to-peer links between rustunnel clients.
Works with the managed rustunnel service or with your own server deployment.
Provides an MCP server and setup guides so agent tools can connect through rustunnel.
Includes a web dashboard, Prometheus metrics, and optional audit logging for tunnel and auth activity.
Covers Docker, systemd, local development, and editor/agent integrations in the docs and integration folders.
rustunnel setup
# Region [auto / eu / us / ap / self-hosted] (default: auto): (press Enter)
#   Selecting nearest region… eu 12ms · us 143ms · ap 311ms · → eu (Helsinki, FI) 12ms
#   Server set to: eu.edge.rustunnel.com:4040
# Auth token: <paste your token>
Selecting nearest region… eu 12ms · us 143ms · ap 311ms → eu (Helsinki, FI) 12ms
✓ tunnel open  https://abc123.eu.edge.rustunnel.com
export TEST_DATABASE_URL=postgres://rustunnel:test@localhost:5432/rustunnel_test
mkdir -p /tmp/rustunnel-dev

openssl req -x509 -newkey rsa:2048 -keyout /tmp/rustunnel-dev/key.pem \
  -out /tmp/rustunnel-dev/cert.pem -days 365 -nodes \
  -subj "/CN=localhost"
cargo run -p rustunnel-server -- --config deploy/local/server.toml
http tunnel  →  http://abc123.localhost:8080
tcp  tunnel  →  tcp://localhost:20000





The open-source tunnel that scales with you. Don't pay for idle time. Secure, Rust-fast, and Pay-as-you-go.
Expose local services through a public server over encrypted WebSocket connections with TLS termination, HTTP/TCP proxying, a live dashboard, Prometheus metrics, and audit logging.
You can self-host or use our managed service.
Using an AI agent? rustunnel ships an MCP server — one-click setup for Cursor (then add your API token):

For Claude Code, Claude Desktop, Windsurf, and others, see the agent integration guide or the agent manual at rustunnel.com/agents.md.
You can use rustunnel without running your own server. We operate a global fleet of public edge servers that you can connect to immediately.
| Region ID | Server | Location | Control plane | Status |
|---|---|---|---|---|
eu | eu.edge.rustunnel.com | Helsinki, FI | :4040 | Live |
us | us.edge.rustunnel.com | Hillsboro, OR | :4040 | Live |
ap | ap.edge.rustunnel.com | Singapore | :4040 | Live |
The client auto-selects the nearest region by default. Use --region <id> to connect to a specific one. The legacy address edge.rustunnel.com is a CNAME to eu.edge.rustunnel.com and will continue to work for backward compatibility.
Sign up for a free account at rustunnel.com — no waiting list, no manual approval.
Plans:
| Plan | Price | Tunnels | Custom subdomains | TLS/HTTPS |
|---|---|---|---|---|
| Free | $0 | Up to 3 | — | ✓ |
| Pay-as-you-go | $3/mo minimum + $0.10/GB | Unlimited | ✓ | ✓ |
| Self-host | Free (run your own server) | Unlimited | ✓ | ✓ |
The free plan is a great way to get started. Upgrade to pay-as-you-go from your dashboard whenever you need custom subdomains or unlimited tunnels.
Once you have a token, run the setup wizard:
rustunnel setup
# Region [auto / eu / us / ap / self-hosted] (default: auto): (press Enter)
#   Selecting nearest region… eu 12ms · us 143ms · ap 311ms · → eu (Helsinki, FI) 12ms
#   Server set to: eu.edge.rustunnel.com:4040
# Auth token: <paste your token>
Then expose a local service:
# HTTP tunnel — auto-selects the nearest region
rustunnel http 3000

# Connect to a specific region
rustunnel http 3000 --region eu

# Custom subdomain
rustunnel http 3000 --subdomain myapp

# TCP tunnel — e.g. expose a local database
rustunnel tcp 5432

# UDP tunnel — e.g. expose a game server
rustunnel udp 27015

# P2P tunnel — expose a service to another rustunnel client
rustunnel p2p 27015 --name my-game --secret "shared-secret"

# P2P tunnel — connect to a peer's service
rustunnel p2p 8000 --target my-game --secret "shared-secret"
The client prints the public URL as soon as the tunnel is established:
  Selecting nearest region… eu 12ms · us 143ms · ap 311ms → eu (Helsinki, FI) 12ms
✓ tunnel open  https://abc123.eu.edge.rustunnel.com
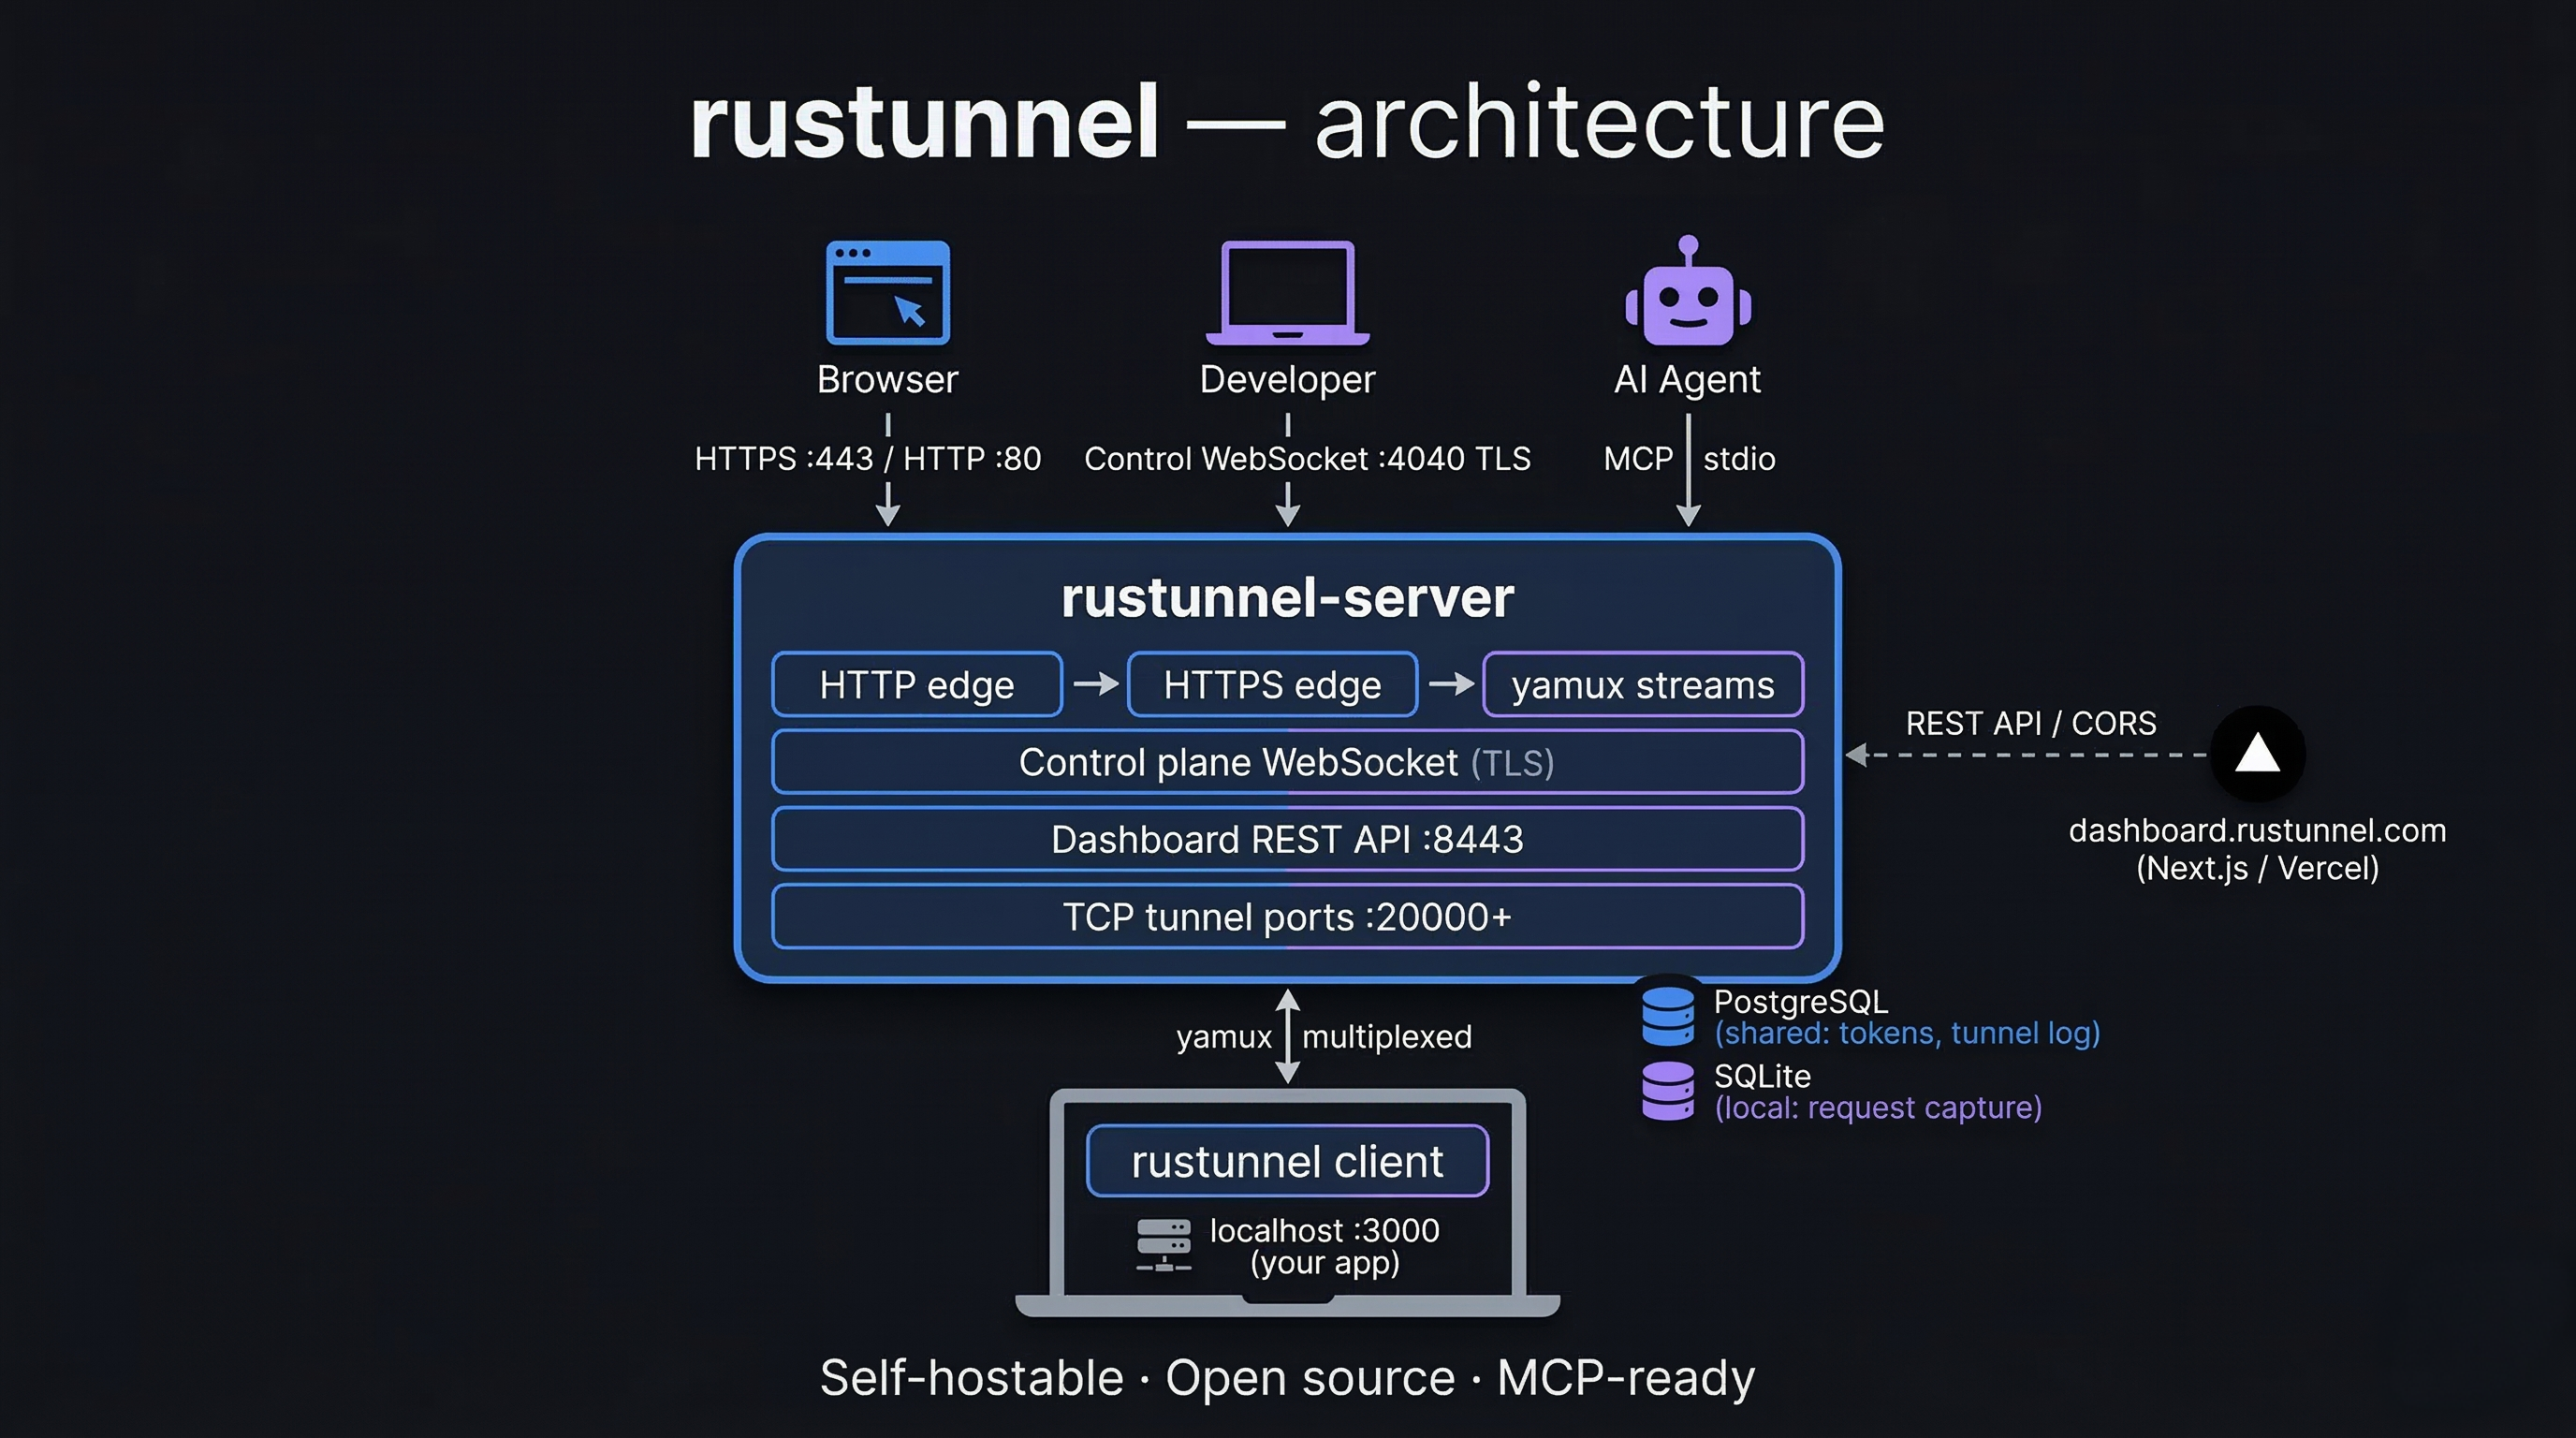
                        ┌──────────────────────────────────────────┐
                        │           rustunnel-server               │
                        │                                          │
Internet ──── :80 ─────▶│  HTTP edge (301 → HTTPS)                 │
Internet ──── :443 ────▶│  HTTPS edge  ──▶ yamux stream ──▶ client │
Client ───── :4040 ────▶│  Control-plane WebSocket (TLS)           │
Browser ──── :8443 ────▶│  Dashboard UI + REST API                 │
Prometheus ─ :9090 ────▶│  Metrics endpoint                        │
Internet ── :20000+ ───▶│  TCP tunnel ports (one per TCP tunnel)   │
                        └──────────────────────────────────────────┘
                                          │ yamux multiplexed streams
                                          ▼
                              ┌─────────────────────┐
                              │   rustunnel client   │
                              │  (developer laptop)  │
                              └──────────┬──────────┘
                                         │ localhost
                                         ▼
                                ┌────────────────┐
                                │  local service  │
                                │  e.g. :3000    │
                                └────────────────┘
| Requirement | Version | Notes |
|---|---|---|
| Rust toolchain | 1.76+ | Install via rustup |
pkg-config | any | Needed by reqwest (TLS) |
libssl-dev | any | On Debian/Ubuntu: apt install libssl-dev |
| Node.js + npm | 18+ | Only needed to rebuild the dashboard UI |
| Requirement | Notes |
|---|---|
| Linux (Ubuntu 22.04+) | systemd service included |
| TLS certificate + private key | PEM format (Let's Encrypt recommended) |
| Public IP / DNS | Wildcard DNS *.tunnel.yourdomain.com → server IP required for HTTP tunnels |
# Clone the repository
git clone https://github.com/joaoh82/rustunnel.git
cd rustunnel

# Compile all workspace crates (debug mode)
cargo build --workspace

# Or use the Makefile shortcut
make build
The integration test suite spins up a real server on random ports and exercises auth, HTTP tunnels, TCP tunnels, and reconnection logic. It requires a running PostgreSQL instance.
# Start the local PostgreSQL container (once per machine, persists across reboots)
make db-start

# Full suite (unit + integration)
make test

# With output visible
TEST_DATABASE_URL=postgres://rustunnel:test@localhost:5432/rustunnel_test \
  cargo test --workspace -- --nocapture

# Stop PostgreSQL when you no longer need it
make db-stop
make db-start runs deploy/docker-compose.dev-deps.yml which starts a Postgres 16 container on localhost:5432. The make test target injects TEST_DATABASE_URL automatically. If you run cargo test directly, export the variable first:
export TEST_DATABASE_URL=postgres://rustunnel:test@localhost:5432/rustunnel_test
Generate a self-signed certificate for local testing:
mkdir -p /tmp/rustunnel-dev

openssl req -x509 -newkey rsa:2048 -keyout /tmp/rustunnel-dev/key.pem \
  -out /tmp/rustunnel-dev/cert.pem -days 365 -nodes \
  -subj "/CN=localhost"
A ready-made local config is checked into the repository at deploy/local/server.toml.
It points to the self-signed cert paths above and has auth disabled for convenience.
Start the server with it directly:
cargo run -p rustunnel-server -- --config deploy/local/server.toml
Key settings in deploy/local/server.toml:
| Setting | Value |
|---|---|
| Domain | localhost |
| HTTP edge | :8080 |
| HTTPS edge | :8443 |
| Control plane | :4040 |
| Dashboard | :4041 |
| Auth token | dev-secret-change-me |
| Auth required | false |
| TLS cert | /tmp/rustunnel-dev/cert.pem |
| TLS key | /tmp/rustunnel-dev/key.pem |
| Database | /tmp/rustunnel-dev/rustunnel.db |
With the server running, expose a local service (e.g. something on port 3000):
# HTTP tunnel
cargo run -p rustunnel-client -- http 3000 \
  --server localhost:4040 \
  --token dev-secret-change-me \
  --insecure

# TCP tunnel
cargo run -p rustunnel-client -- tcp 5432 \
  --server localhost:4040 \
  --token dev-secret-change-me \
  --insecure
--insecureskips TLS certificate verification. Required when using a self-signed certificate locally. Never use this flag against a production server.
The client will print a public URL, for example:
http tunnel  →  http://abc123.localhost:8080
tcp  tunnel  →  tcp://localhost:20000
The tunnel URL uses a subdomain (e.g. http://abc123.localhost:8080).
Browsers won't resolve *.localhost subdomains by default, so you have two options:
Option A — curl with a Host header (no setup required)
curl -v -H "Host: abc123.localhost" http://localhost:8080/
Option B — wildcard DNS via dnsmasq (enables browser access)
# Install and configure dnsmasq to resolve *.localhost → 127.0.0.1
brew install dnsmasq
echo "address=/.localhost/127.0.0.1" | sudo tee -a $(brew --prefix)/etc/dnsmasq.conf
sudo brew services start dnsmasq

# Tell macOS to use dnsmasq for .localhost queries
sudo mkdir -p /etc/resolver
echo "nameserver 127.0.0.1" | sudo tee /etc/resolver/localhost
Then visit http://abc123.localhost:8080 in the browser (include :8080 since the
local config uses port 8080, not port 80).
A pre-push hook is included in .githooks/ that mirrors the CI check step
(format check + Clippy). Run this once after cloning to activate it:
make install-hooks
From that point on, every git push will automatically run:
cargo fmt --all -- --check
cargo clippy --workspace --all-targets -- -D warnings
If either check fails the push is aborted, keeping the remote branch green.
The steps below match a deployment where:
edge.rustunnel.com*.edge.rustunnel.com → <server IP>apt update && apt install -y \
pkg-config libssl-dev curl git \
certbot python3-certbot-dns-cloudflare
Install Rust (as the build user, not root):
curl --proto '=https' --tlsv1.2 -sSf https://sh.rustup.rs | sh
source "$HOME/.cargo/env"
git clone https://github.com/joaoh82/rustunnel.git
cd rustunnel
cargo build --release -p rustunnel-server -p rustunnel-client
Binaries will be at:
target/release/rustunnel-servertarget/release/rustunneluseradd --system --no-create-home --shell /usr/sbin/nologin rustunnel
mkdir -p /etc/rustunnel /var/lib/rustunnel
chown rustunnel:rustunnel /var/lib/rustunnel
chmod 750 /var/lib/rustunnel
install -Dm755 target/release/rustunnel-server /usr/local/bin/rustunnel-server

# Optionally install the client system-wide
install -Dm755 target/release/rustunnel /usr/local/bin/rustunnel
Or use the Makefile target (runs build + install + systemd setup):
sudo make deploy
rustunnel requires PostgreSQL for shared state (tokens, tunnel history, audit log).
apt install -y postgresql postgresql-contrib

# Start and enable the service
systemctl enable --now postgresql
Create a dedicated database and user:
sudo -u postgres psql <<'SQL'
CREATE USER rustunnel WITH PASSWORD 'CHANGE_ME';
CREATE DATABASE rustunnel OWNER rustunnel;
GRANT ALL PRIVILEGES ON DATABASE rustunnel TO rustunnel;
SQL
Tip: For managed PostgreSQL (e.g. AWS RDS, DigitalOcean Managed Database, Supabase) skip the
apt installstep above and just note the connection URL for the config in the next step.
Schema migrations run automatically when the server starts — no manual SQL needed.
Create /etc/rustunnel/server.toml with the content below.
Replace your-admin-token-here with a strong random secret (e.g. openssl rand -hex 32).
# /etc/rustunnel/server.toml

[server]
# Primary domain — must match your wildcard DNS record.
domain       = "edge.rustunnel.com"

# Ports for incoming tunnel traffic (requires CAP_NET_BIND_SERVICE or root).
http_port    = 80
https_port   = 443

# Control-plane WebSocket port — clients connect here.
control_port = 4040

# Dashboard UI and REST API port.
dashboard_port = 8443

# Allowed CORS origin for the dashboard UI.
# Set to the URL where you serve the dashboard-ui (e.g. http://localhost:3000 for local dev).
dashboard_origin = "http://localhost:3000"

# ── TLS ─────────────────────────────────────────────────────────────────────
[tls]
# Paths written by Certbot (see step 6).
cert_path = "/etc/letsencrypt/live/edge.rustunnel.com/fullchain.pem"
key_path  = "/etc/letsencrypt/live/edge.rustunnel.com/privkey.pem"

# Set acme_enabled = true only if you want rustunnel to manage certs itself
# via the ACME protocol (requires Cloudflare credentials below).
# When using Certbot (recommended), leave this false.
acme_enabled = false

# ── Auth ─────────────────────────────────────────────────────────────────────
[auth]
# Strong random secret — used both as the admin token and for client auth.
# Generate: openssl rand -hex 32
admin_token  = "your-admin-token-here"
require_auth = true
# Failed auth attempts per source IP per minute before rejection (0 = off).
max_failed_auth_per_minute = 10

# ── Database ─────────────────────────────────────────────────────────────────
[database]
# PostgreSQL connection URL — the database and user must exist before starting
# the server (see the PostgreSQL setup step above).  Schema migrations run
# automatically on first start.
url = "postgresql://rustunnel:CHANGE_ME@localhost:5432/rustunnel"

# Per-region SQLite file for captured HTTP request bodies.
# The directory must be writable by the rustunnel user.
captured_path = "/var/lib/rustunnel/captured.db"

# ── Logging ──────────────────────────────────────────────────────────────────
[logging]
level  = "info"
format = "json"

# Optional: write an append-only audit log (JSON-lines) for auth attempts,
# tunnel registrations, token creation/deletion, and admin actions.
# Omit or comment out to disable.
audit_log_path = "/var/lib/rustunnel/audit.log"

# ── Limits ───────────────────────────────────────────────────────────────────
[limits]
# Maximum tunnels a single authenticated session may register.
max_tunnels_per_session = 10

# Maximum simultaneous proxied connections per tunnel (semaphore).
max_connections_per_tunnel = 100

# Per-tunnel request rate limit (requests/second).
rate_limit_rps = 100

# Per-source-IP rate limit (requests/second). Set to 0 to disable.
ip_rate_limit_rps = 100

# Maximum size of a proxied HTTP request body (bytes). Default: 10 MB.
request_body_max_bytes = 10485760

# Inclusive port range reserved for TCP tunnels.
# Each active TCP tunnel consumes one port from this range.
tcp_port_range = [20000, 20099]

# Inclusive port range reserved for UDP tunnels.
# Each active UDP tunnel consumes one port from this range.
# Must not overlap with tcp_port_range. Set to [0, 0] to disable UDP tunnels.
udp_port_range = [20100, 20199]
Secure the file:
chown root:rustunnel /etc/rustunnel/server.toml
chmod 640 /etc/rustunnel/server.toml
Create the Cloudflare credentials file:
cat > /etc/letsencrypt/cloudflare.ini <<'EOF'
# Cloudflare API token with DNS:Edit permission for the zone.
dns_cloudflare_api_token = YOUR_CLOUDFLARE_API_TOKEN
EOF

chmod 600 /etc/letsencrypt/cloudflare.ini
Request a certificate covering the bare domain and the wildcard (required for HTTP subdomain tunnels):
certbot certonly \
  --dns-cloudflare \
  --dns-cloudflare-credentials /etc/letsencrypt/cloudflare.ini \
  -d "edge.rustunnel.com" \
  -d "*.edge.rustunnel.com" \
  --agree-tos \
  --email your@email.com
Certbot writes the certificate to:
/etc/letsencrypt/live/edge.rustunnel.com/fullchain.pem
/etc/letsencrypt/live/edge.rustunnel.com/privkey.pem
These paths are already set in the config above. Certbot sets up automatic renewal via a systemd timer.
rustunnel reads TLS certificates from disk at startup, so it must be restarted after each renewal. Add a Certbot deploy hook to do this automatically:
cat > /etc/letsencrypt/renewal-hooks/deploy/restart-rustunnel.sh <<'EOF'
#!/bin/sh
systemctl restart rustunnel.service
EOF
chmod +x /etc/letsencrypt/renewal-hooks/deploy/restart-rustunnel.sh
Allow the rustunnel service user to read the certificates:
# Grant read access to the live/ and archive/ directories
chmod 755 /etc/letsencrypt/{live,archive}
chmod 640 /etc/letsencrypt/live/edge.rustunnel.com/*.pem
chgrp rustunnel /etc/letsencrypt/live/edge.rustunnel.com/*.pem
chgrp rustunnel /etc/letsencrypt/archive/edge.rustunnel.com/*.pem
chmod 640 /etc/letsencrypt/archive/edge.rustunnel.com/*.pem
# Copy the unit file from the repository
install -Dm644 deploy/rustunnel.service /etc/systemd/system/rustunnel.service

systemctl daemon-reload
systemctl enable --now rustunnel.service

# Check it started
systemctl status rustunnel.service
journalctl -u rustunnel.service -f
ufw allow 80/tcp   comment "rustunnel HTTP edge"
ufw allow 443/tcp  comment "rustunnel HTTPS edge"
ufw allow 4040/tcp comment "rustunnel control plane"
ufw allow 8443/tcp comment "rustunnel dashboard"
ufw allow 9090/tcp comment "rustunnel Prometheus metrics"

# TCP tunnel port range (must match tcp_port_range in server.toml)
ufw allow 20000:20099/tcp comment "rustunnel TCP tunnels"

# UDP tunnel port range (must match udp_port_range in server.toml)
ufw allow 20100:20199/udp comment "rustunnel UDP tunnels"
# Health check — use dashboard_port from server.toml (default 8443 in production)
curl http://localhost:8443/api/status

# Confirm which ports the process is actually bound to
ss -tlnp | grep rustunnel-serve

# Startup banner is visible in the logs
journalctl -u rustunnel.service --no-pager | tail -30

# Prometheus metrics
curl -s http://localhost:9090/metrics
Port reminder: port 4040 is the control-plane WebSocket (clients connect here), not the dashboard. Hitting it with plain HTTP returns
HTTP/0.9which is expected. The dashboard is ondashboard_port— check yourserver.tomlif unsure.
Pull the latest code, rebuild, install, and restart in one command:
cd ~/rustunnel && sudo make update-server
This runs git pull → cargo build --release → install → systemctl restart → systemctl status.
A full Docker guide covering both local development (self-signed cert) and production VPS (Let's Encrypt) is available in docs/docker-deployment.md.
Multi-arch images (linux/amd64 + linux/arm64) are published to GitHub
Container Registry on every stable release — no build required:
# Latest stable, or pin a version (e.g. :0.8.1)
docker pull ghcr.io/joaoh82/rustunnel-server:latest

# Run it with your server config mounted at /etc/rustunnel/server.toml
docker run --rm \
  -p 80:80 -p 443:443 -p 4040:4040 -p 8443:8443 \
  -v "$PWD/deploy/server.toml:/etc/rustunnel/server.toml:ro" \
  ghcr.io/joaoh82/rustunnel-server:latest
# Build the image locally (includes Next.js dashboard + Rust server)
make docker-build

# Build and push a multi-arch image to GHCR (maintainers; needs buildx + ghcr login)
make docker-push

# Local development (self-signed cert, no auth required)
docker compose -f deploy/docker-compose.local.yml up

# Production VPS (requires deploy/server.toml to be configured first)
make docker-run

# Production + Prometheus + Grafana monitoring stack
make docker-run-monitoring

# Tail server logs
make docker-logs

# Stop everything
make docker-stop
| File | Purpose |
|---|---|
deploy/Dockerfile | Multi-stage build: Node.js UI → Rust server → slim runtime |
deploy/docker-compose.yml | Production compose file |
deploy/docker-compose.local.yml | Local development compose file |
deploy/server.toml | Production server config template |
deploy/server.local.toml | Local development server config |
deploy/prometheus.yml | Prometheus scrape config |
Option 1 — Homebrew (macOS and Linux, recommended)
brew tap joaoh82/rustunnel
brew install rustunnel
Homebrew installs pre-built binaries — no Rust toolchain required.
The formula is updated automatically on every release. This installs
both rustunnel (the CLI client) and rustunnel-mcp (the MCP server
for AI agent integration).
Option 2 — Pre-built binary
Download the archive for your platform from the
latest GitHub Release,
extract it, and move the rustunnel binary to a directory on your $PATH:
# Example for macOS Apple Silicon
curl -L https://github.com/joaoh82/rustunnel/releases/latest/download/rustunnel-<version
Sign in to join the discussion.
No comments yet. Be the first to say what this is good for.
🪨 why use many token when few token do trick — Claude Code skill that cuts 65% of tokens by talking like caveman

The best-benchmarked open-source AI memory system. And it's free.

Orca is the ADE for working with a fleet of parallel agents. Run any coding agent with your own subscription. Available on desktop, mobile and remote runtime.
A cross-platform desktop All-in-One assistant for Claude Code, Codex, OpenCode, OpenClaw, Grok Build & Hermes Agent. Only official website: ccswitch.io

Never stop coding. Free MIT AI gateway: one endpoint, 352 providers (150+ free), 1200+ models Kimi, Claude, GPT, Gemini, GLM, DeepSeek, MiniMax. Works with Claude Code, Codex, Cursor, OpenCode, Cline & Copilot. Quota-aware auto-fallback, RTK+Caveman compression saves 15-95% tokens, MCP/A2A, Desktop/PWA. Built by 550+ contributors

Compress tool outputs, logs, files, and RAG chunks before they reach the LLM. 20% fewer tokens for coding agents, 60-95% fewer tokens for JSON, same answers. Library, proxy, MCP server.